![]()
Welcome to our blog.
Sorry, no results were found, search again?
![]()
Welcome to our blog.
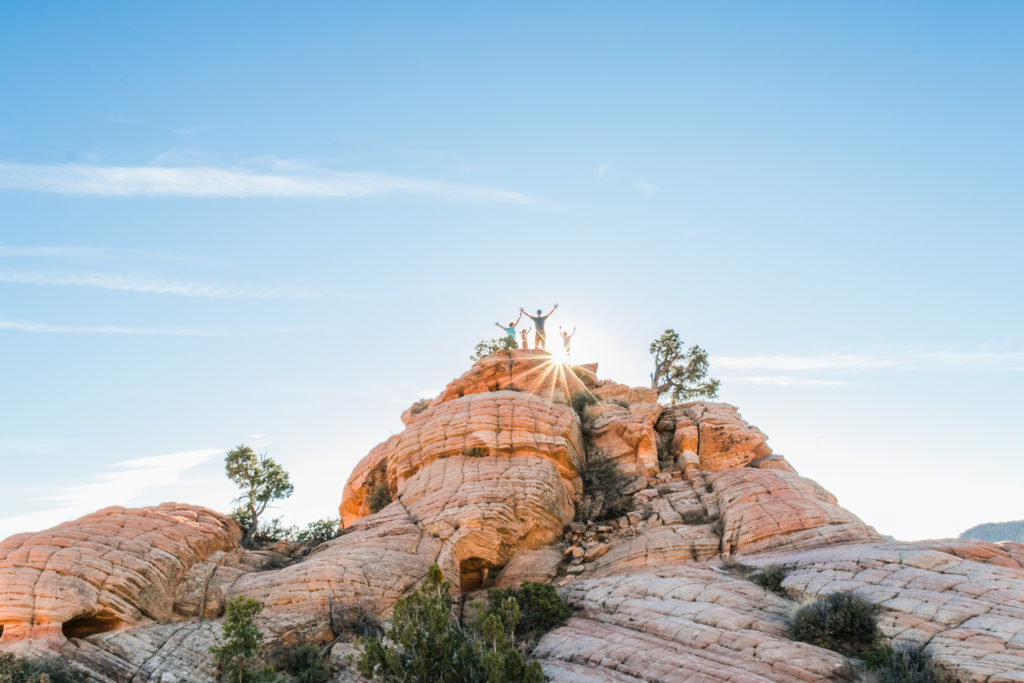
Southern Utah is an outdoor lover’s paradise with adventures for everyone. Whether you’re wanting to slide into a narrow slot canyon, discover a waterfall amidst a desert oasis, scale sandstone cliffs or explore Dr. Seuss-like rock formations, this part of Utah has it all.
While there’s no shortage of “epic” when it comes to hikes in Southern Utah, finding the right ones that you can take your kids on can be a little more of a challenge. I have put together a list of 10 epic family-friendly hikes in Southern Utah. Make sure to check out our comprehensive guide to other outdoor activities near St. George, Utah too.
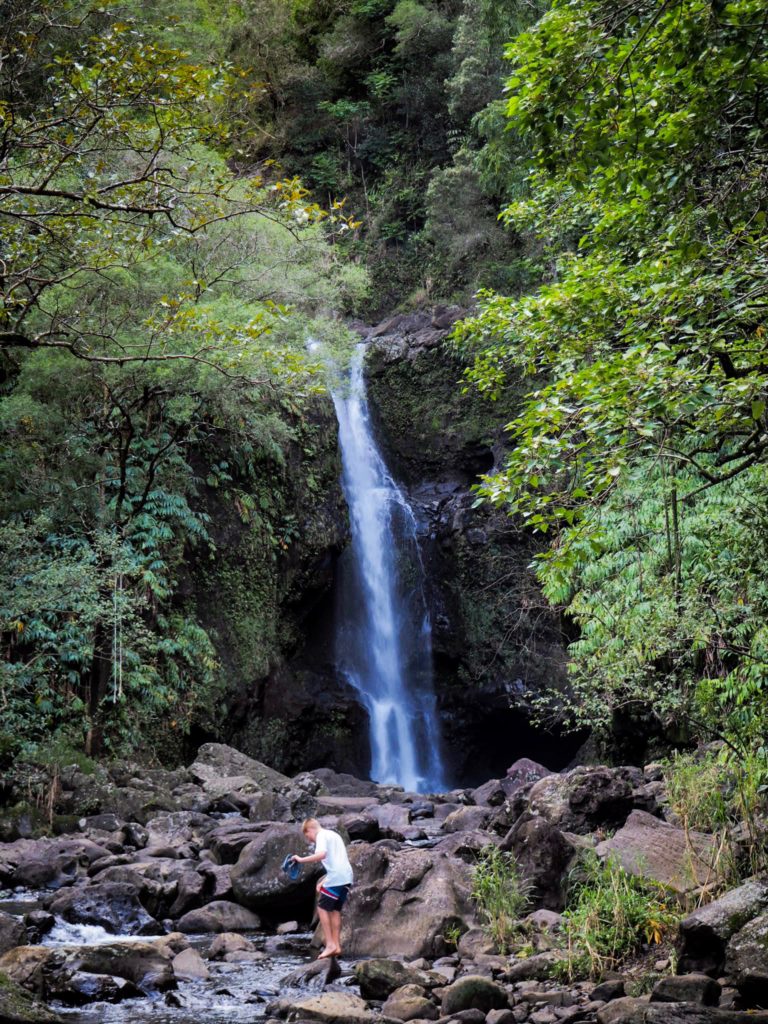
Kanarra Creek is stunning slot canyon where you climb a ladder in the midst of a magical waterfall. Plan on getting your feet wet and sliding down a natural water slide. The trail to Kanarraville Falls is as photogenic as they come with vibrant green trees and plants sprouting up throughout the hike. There is some rock scrambling, but experienced little hikers shouldn’t have any trouble making it through this one with a little bit of help. The entire hike is around 3.5 miles round trip.
Hiking through Kannara Creek Canyon to the falls is an adventure your kids love!
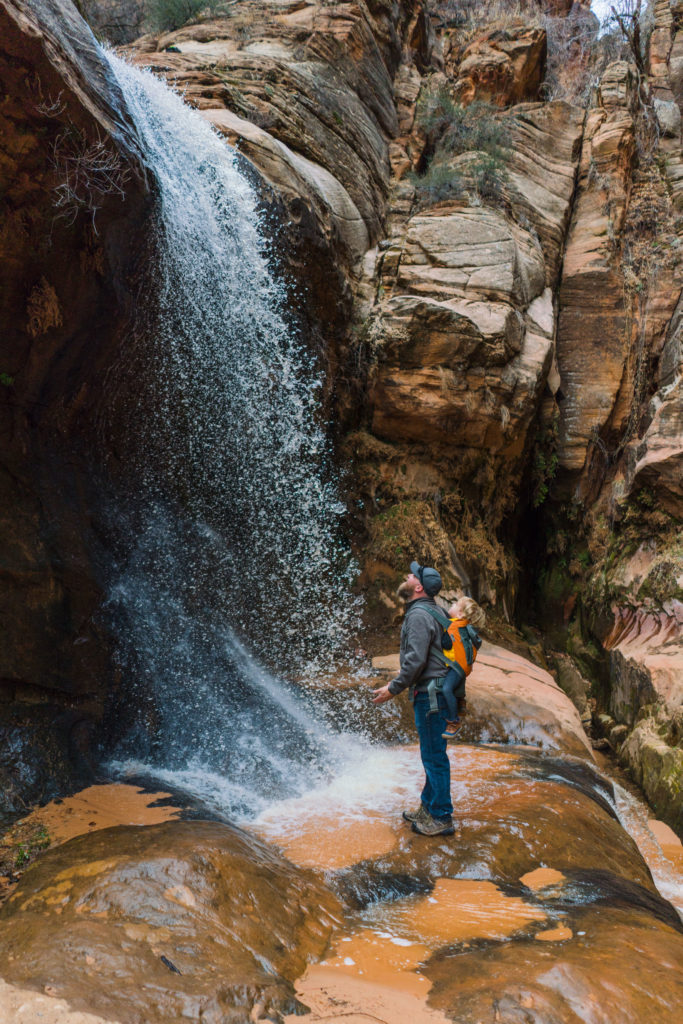
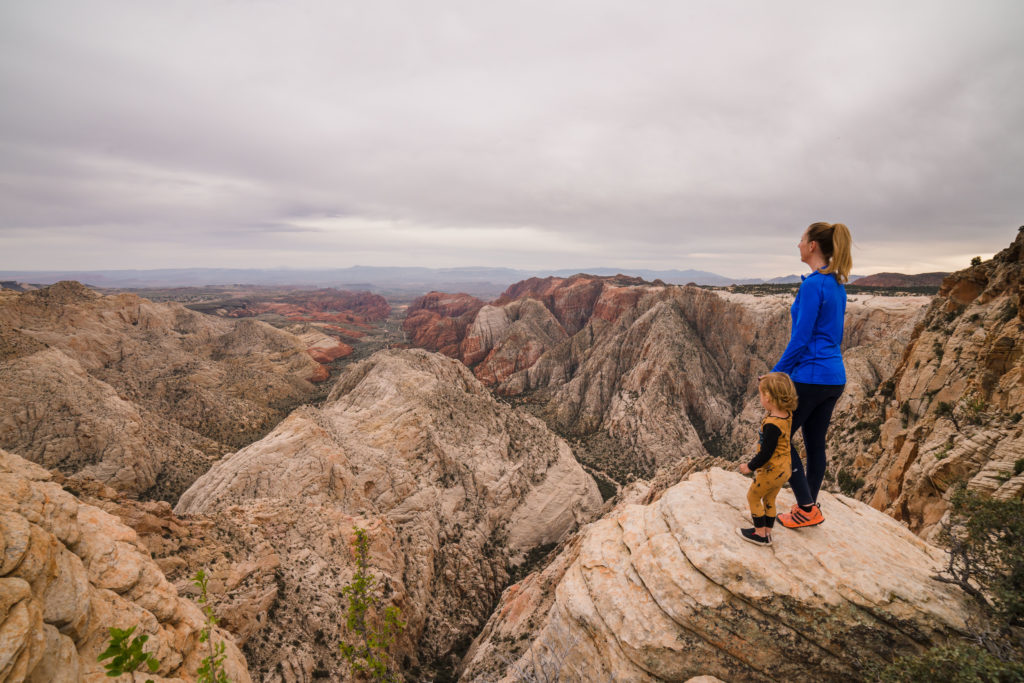
The Red Reef trail, just outside St. George, Utah will excite toddlers and teens alike with an elephant-like tree trunk to crawl in, caves, petroglyphs, and water running for at least six months of the year making pools to swim and jump in. This trail starts out in the Red Cliff Reserve campground and ventures into a canyon that gets more narrow as you travel up.
Look for a giant cholla standing proudly alongside the trail after you climb the first little hill. This hike has tons of bouldering for kids, and in spite of being a short trail (less than 3 miles round trip), it also offers a few offshoots to explore that can extend the hike.
The hike on the Red Reef trail through Red Cliffs Recreation Area just outside St. George, Utah is the perfect day adventure with kids of all ages.
One short climb at the beginning and then a meandering trail takes you to one of the best views in Zion National Park, the Canyon Overlook. As long as no one is afraid of heights, the whole family will love this trail, plus it is only 1 mile round trip! You get a wooden walkway hanging over a cliff, a cave-like overhang to explore, and bighorn sheep sightings on this trail. This trail can get crowded so consider going earlier in the morning to beat the rush or brave the crowds and watch an epic sunset at the overlook.
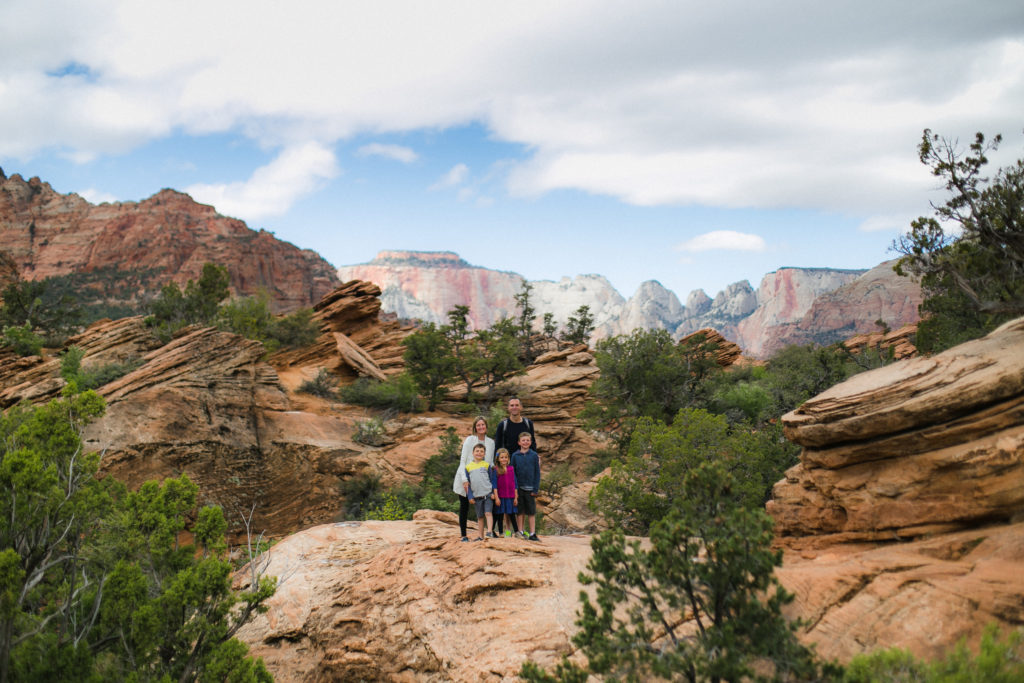
The Canyon Overlook trail in Zion National Park offers great views without too much work, making it a great hiking option with littles.
The other-worldly Yant Flat (otherwise known as Candy Cliffs) in Dixie National Forest begins with a short 1.5-mile hike through the woods before reaching open terrain of swirling smooth rock formations that spill out for miles. The landscape can be steep at times, and there are cliffs to be aware of, but the sticky rock will allow kids to adventure across much of the area.
Make sure to pay attention to weather patterns in this area. The road getting out to Yant Flat is dirt and can muddy up quickly, making it hard for a car to pass. Depending on how much exploring you do, this hike can be 3 to 7 miles round trip.
Yant Flat in Dixie National Forest, Utah is lesser known, but a fun playground to explore.
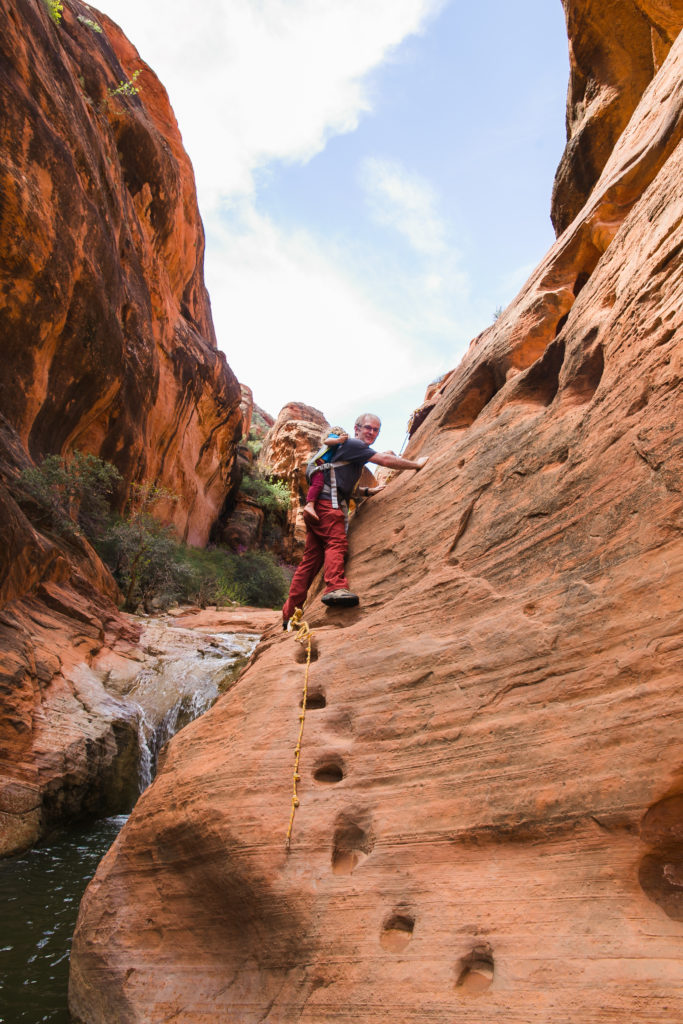
Located at the end of a 4-wheel drive dirt road, Water Canyon is a hidden gem just outside of Hildale that has a shallow year-round creek and a waterfall as a reward at the end of the first part of the hike. You can venture on farther, but this isn’t advised with young kids. The trail can be a little tricky due to all the rock scrambling that is required.
Look up as you hike to find an arch in the rocks high above to the right as you venture up the canyon. Also, keep an eye out for narrow slots along the trail that only little kids can slide into. This trail is around 3-4 miles round trip depending on far up the canyon you explore.
Water Canyon in Cannan Mountain is just outside Hildale, Utah is a hidden gem waiting to be discovered.
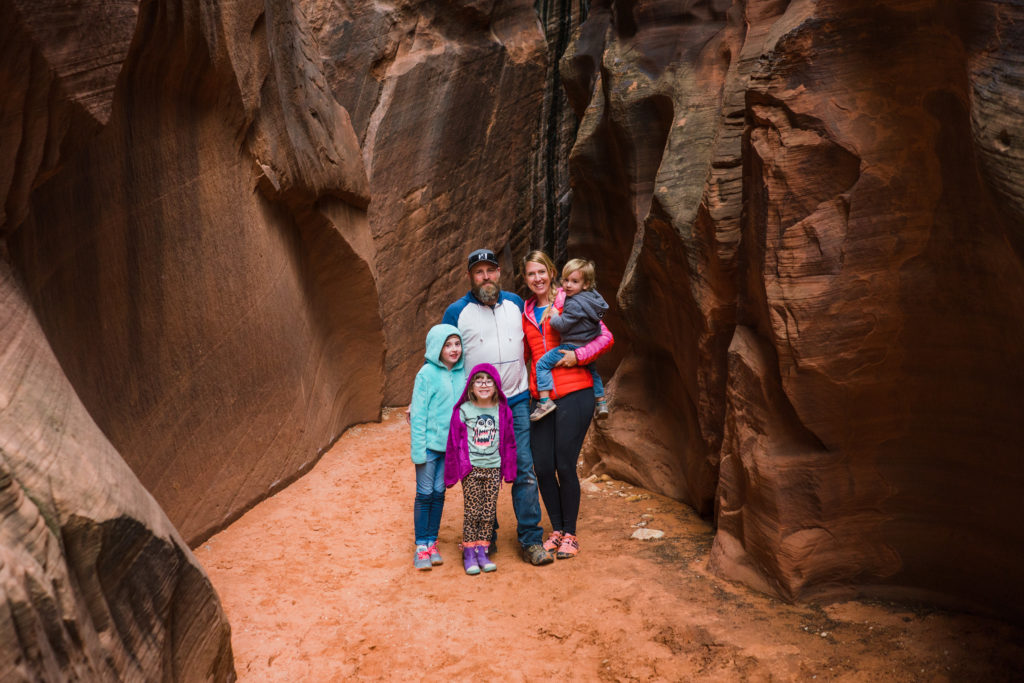
There is nothing quite like a good slot canyon to make a simple hike feel like a grand adventure. Wire Pass Trail, located off a bumpy dirt road one hour east of Kanab, UT, is the perfect day hike to escape from it all and get the adventure juices flowing. At less than 4 miles round trip, families and seasoned adventure junkies alike will enjoy exploring in the deep narrows and taking in the quiet solitude and beauty of the wavy red rock walls.
This trail is best visited from March through October and is also dog-friendly. You can also access Buckskin Gulch from this trail, the longest slot canyon in the Southwest and popular with overnight backpackers.
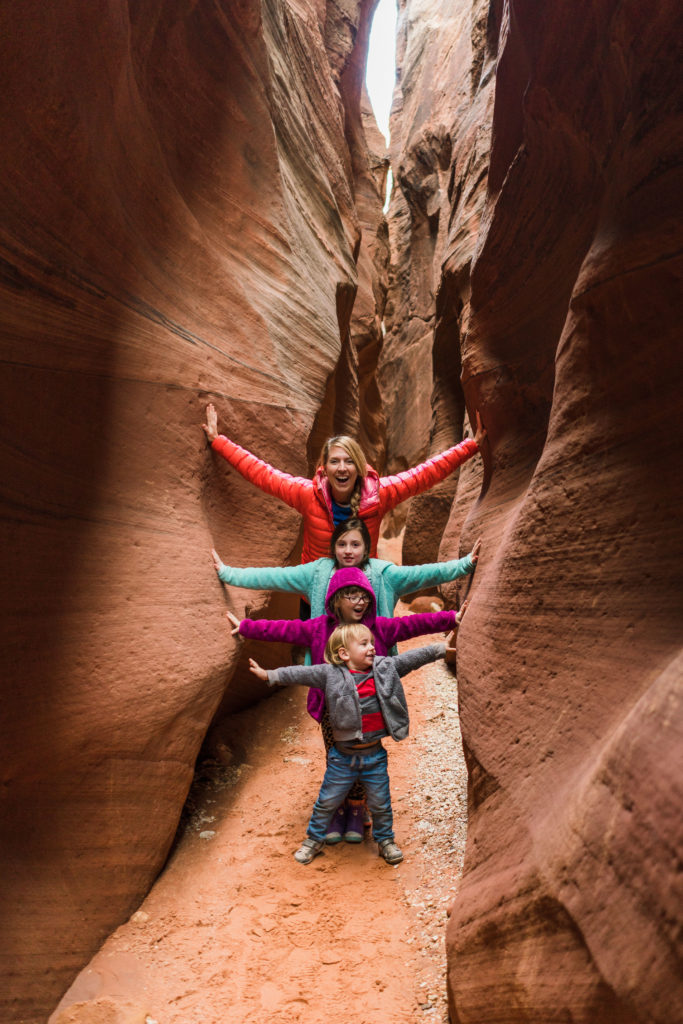
If you want the experience of a slot canyon, but without too many people, Wire Pass trail in Kanab, Utah will not disappoint.
This is the longest hike on the list, at 6 miles round trip, but believe me, the destination is worth it. Calf Creek Falls is hot and exposed in the summer sun, so prepare accordingly with lots of water, sunscreen, snacks and plenty of breaks along the way. Look for panels of petroglyphs on the sheer cliff walls while you hike, to keep the kids entertained.
Once you reach the end, you reach a beautiful waterfall oasis ideal for resting in the shade, playing in the sand, and sliding down the mossy edges of the waterfall. It is a bit cold for swimming, but on a hot summer day, it is perfect for a quick dip before journeying back.
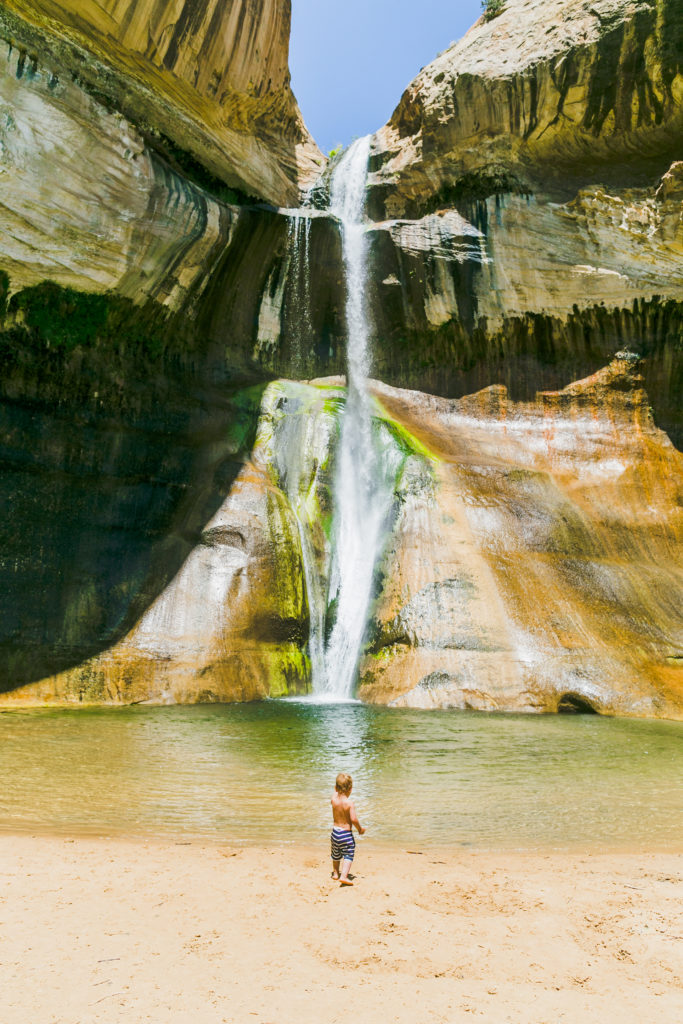
Calf Creek Falls in Grand Staircase-Escalante, Utah is the perfect hike for kids who love water.
Off the beaten path, the trail to Snow Canyon Overlook is located at the far north side of Snow Canyon State Park, long past where the main tourist stream of people travel. There’s plenty of parking in the large lot, and the trail is easy to navigate. A rocky and at times sandy 2.5-mile hike takes you to expansive and stunning views of Snow Canyon that will take your breath away.
Many of the trails in Snow Canyon State Park, Utah can be quite popular, but this hike to Snow Canyon Overlook is out of radar mostly, making it great for getting away from the hustle and bustle of a busy park.
Bryce Canyon National Park is all about the hoodoos, the tall eroded spires that jut out of the desert landscape. If you only have time to do one trail while in Bryce, the Navajo Loop trail is the adventure you should choose. This is a family-friendly, action-packed trail that is only 1.5 miles long (unless you combine with the Queens-Garden loop) with switchbacks, carved out caves to climb in and views for days.
There is a steep climb at the end of this hike, so take it slow and take plenty of snack breaks. Avoid hiking this on a rainy day as the sticky cement-like mud makes the trail impossible to hike and very slippery. Read our comprehensive guide to Bryce Canyon for more hikes and other ideas on what to do in this beautiful national park.
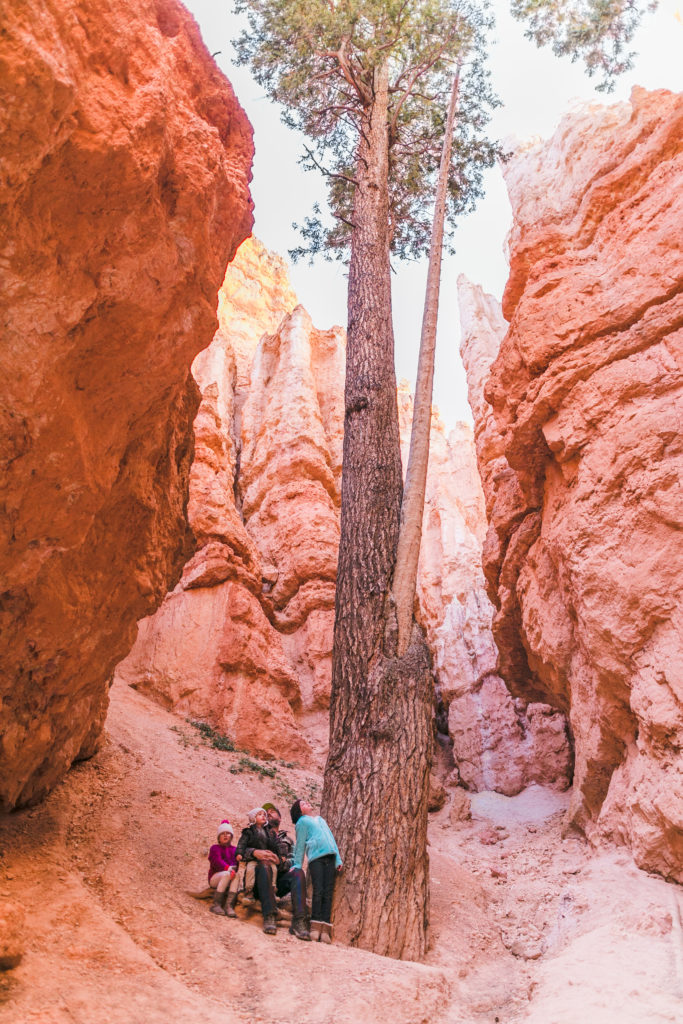
You haven’t been to Bryce Canyon National Park, Utah until you’ve hiked the infamous Navajo trail.
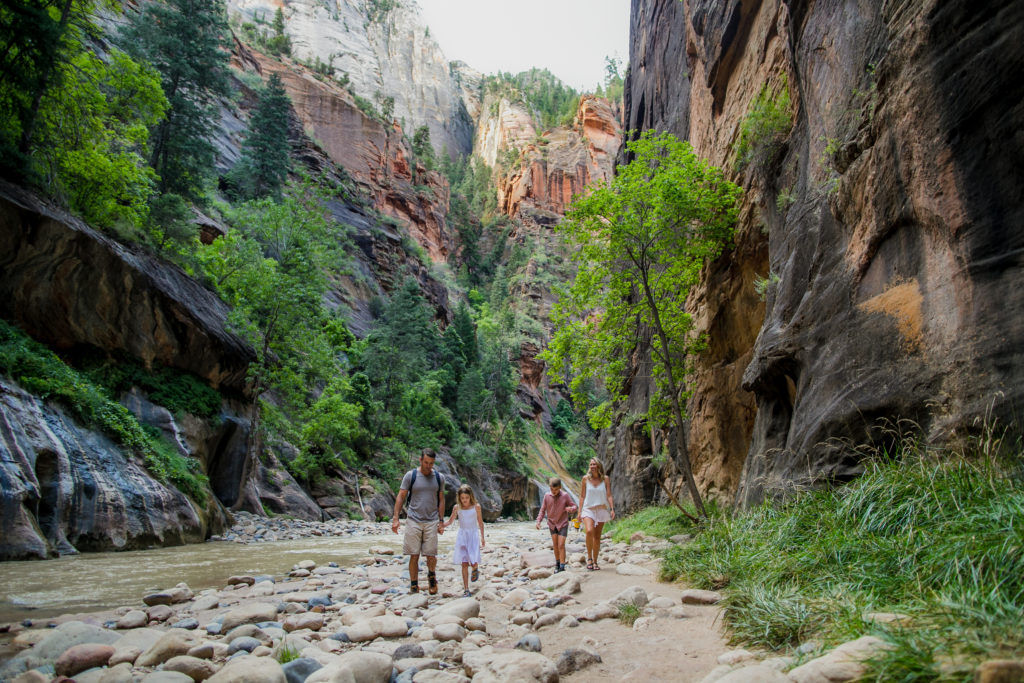
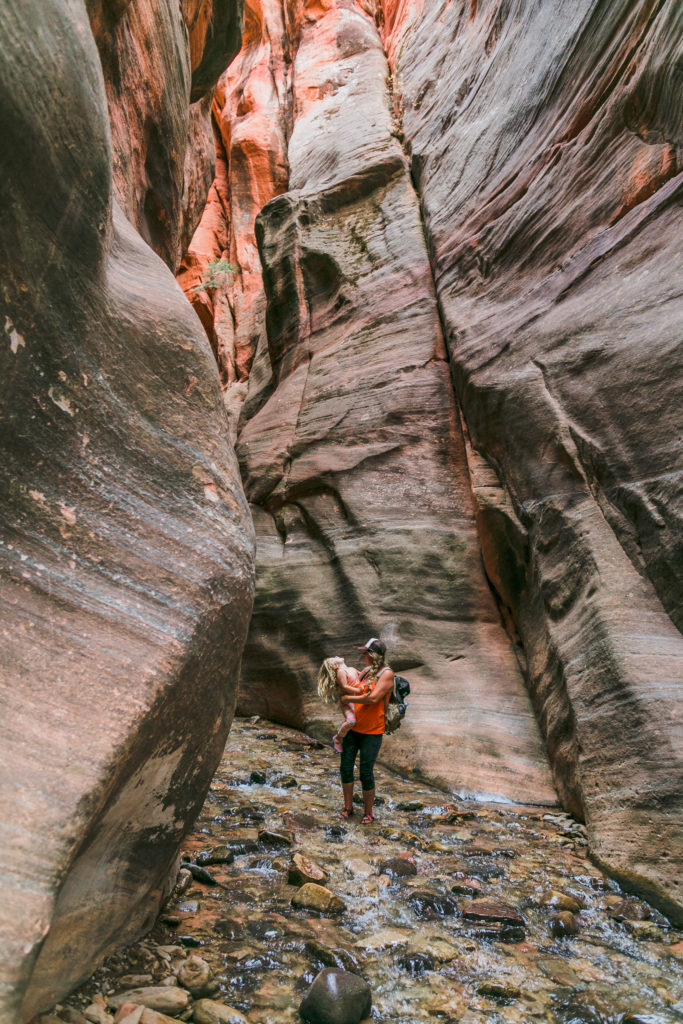
One of the most famous adventure hikes in Zion National Park, the Narrows trail is around 5 miles round trip and paved all the way up to the point when you start wading in the Virgin River up the canyon. In the summer, this hike is the perfect reprieve from the intense summer heat, and kids love the opportunity to hike in the water. While The Narrows can feel a bit like a freeway at rush hour due to being so popular, it’s still beautiful and gives you the feeling of a true slot canyon with rock walls that shoot up for thousands of feet.
At a certain point, this hike becomes a permit-only adventure, and everyone has to turn around. Be aware of weather conditions because flash floods are a possibility. For more info on this hike, find a complete guide to hiking the Narrows and other hikes in Zion National Park with kids.
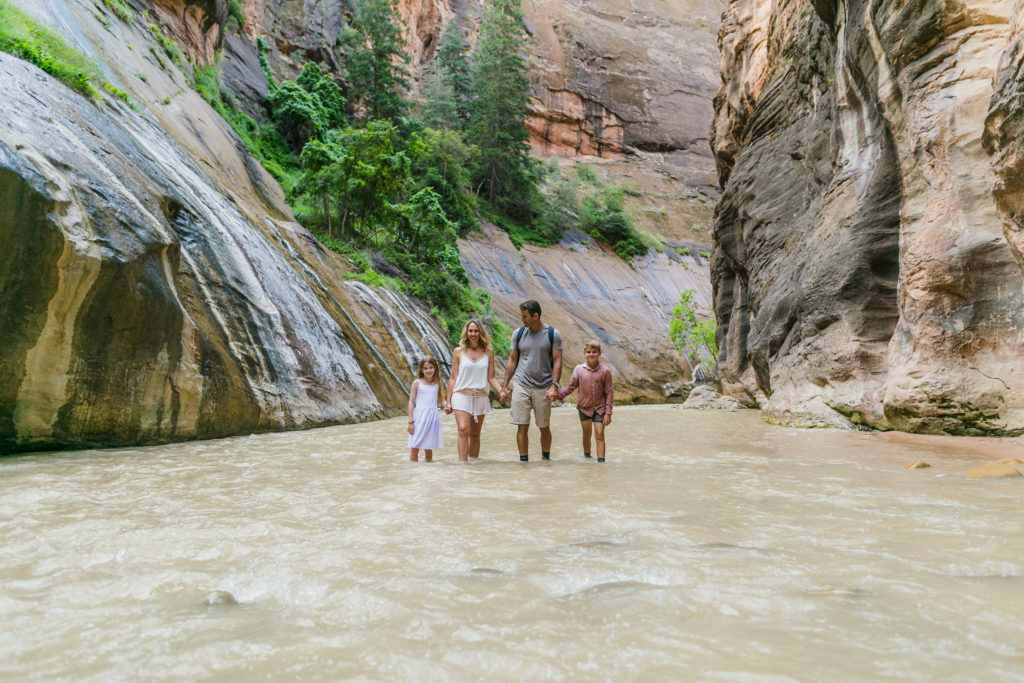
Hiking through the Narrows in Zion National Park will likely be one of your all-time favorite hikes.
Do you have a hike in Southern Utah you would like to add to this list? Let us know in the comments!
About Arika Bauer:
Arika Bauer is a Southern Utah local, born and raised, and the owner of Zion Adventure Photog, a photography business dedicated to photographing world travelers, outdoor lovers, and adventure junkies in one of the most beautiful settings in the world. She has made it her mission to explore all of the hidden, and not-so-hidden gems of Southern Utah, with her husband and three kids and shares about different adventures in Southern Utah on her blog. You can also connect with her on Facebook and Instagram.
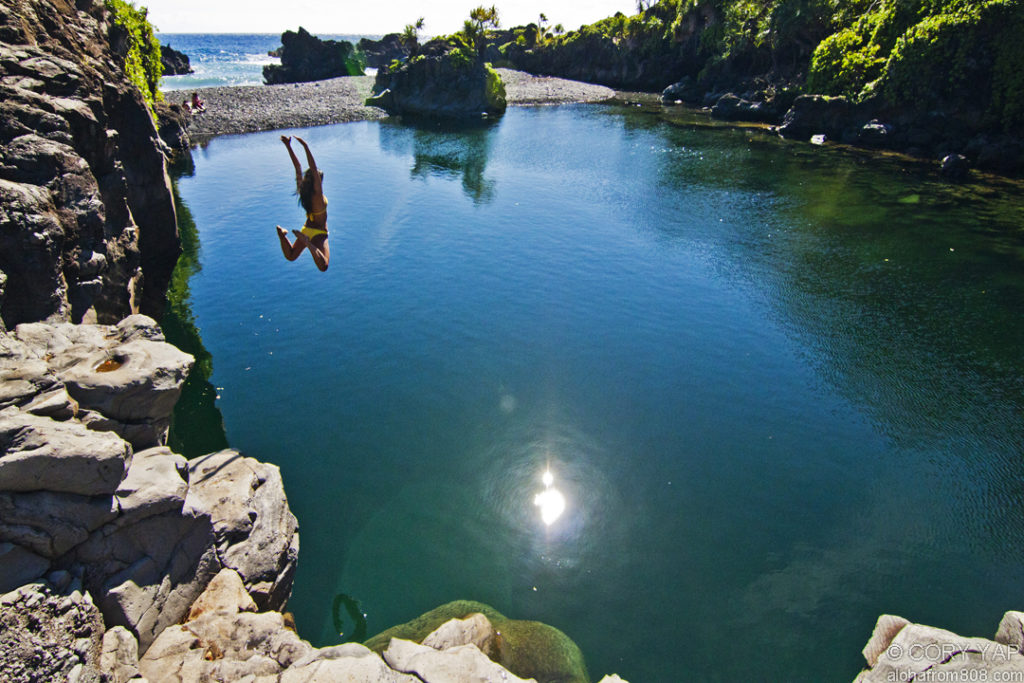
Maui is perhaps our favorite Hawaiian island (ok, it might tie with Kauai), especially with kids. There is so much to do on Maui that you could spend an entire month on the island and still not hit all the highlights. The good news is we have come up with 10 of the top FREE (or nearly free) outdoor adventures to do in Maui.
Because isn’t getting to Hawaii expensive enough?
The great thing about this list is that these activities are great for families with kids of ALL ages. So whether you have toddlers or teens, you will find a plethora of activities to satisfy everyone’s thirst for adventure in Maui. We have ranked all of these in order of our favorites as to help you prioritize the absolute must-dos.
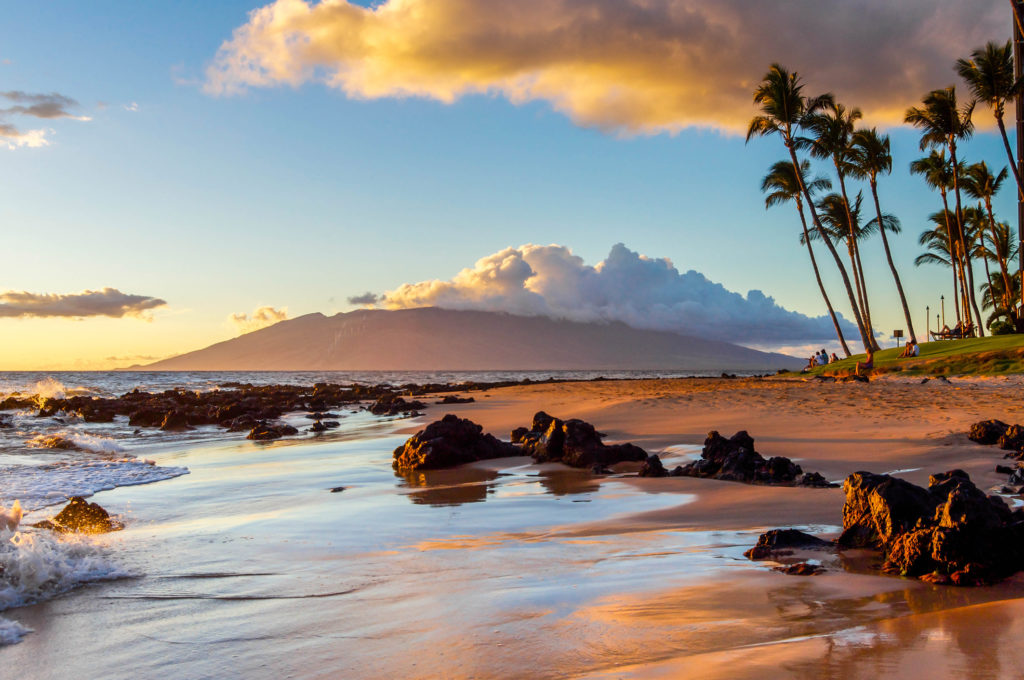
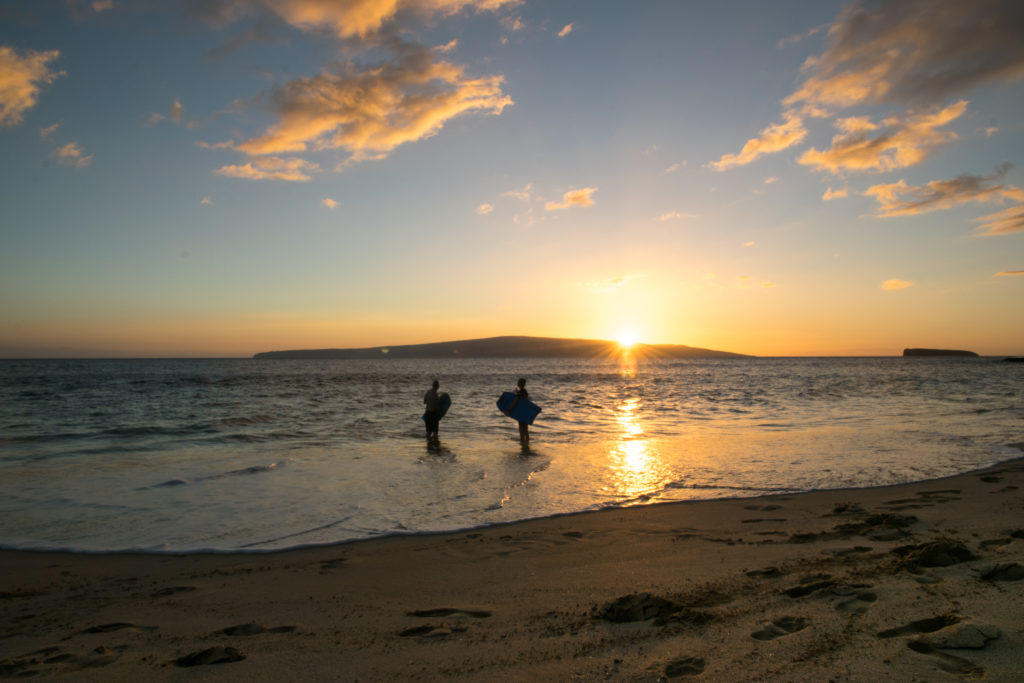
You simply can’t beat the sunsets on the west coast of Maui.
About 8 miles past Kapalua in North Maui lies the famous Nakalele Blowhole. To find the trail to the blowhole (about a mile walk round trip), park where you see mileage marker 38.5. Not only is this the safest route down to the blowhole, it also offers a chance to see the famous heart-shaped rock on your hike down. *Warning: Stay far from the blowhole and on dry rocks so you don’t slip and get sucked in to the blowhole!

Maui’s Nakalele Blowhole. Photo courtesy of Hawaii.com
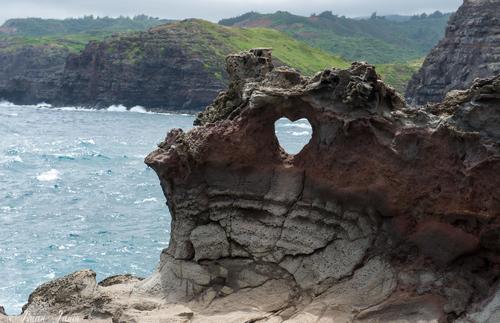
Maui’s heart shaped rock is almost more famous than the blowhole thanks to Instagram. Photo courtesy of Frommer’s.
The breathtaking 5 mile hike along the Waihe’e Ridge takes you to the top of this scenic overlook. Hike through lush jungle while spotting waterfalls in the distance along this beautiful ridge where you will be rewarded with views of the ocean and the valley below. While this hike isn’t particularly difficult (yes, kids can do this hike!), the trail can be muddy, so make sure to have shoes or sandals with good traction.
To get to the Waihe’e Ridge trail, take the road across from Mendes Ranch and continue uphill for almost a mile until you come to a large parking lot. Once you make your way to the trailhead, you will see two gates. Take the gate and path that leads uphill.
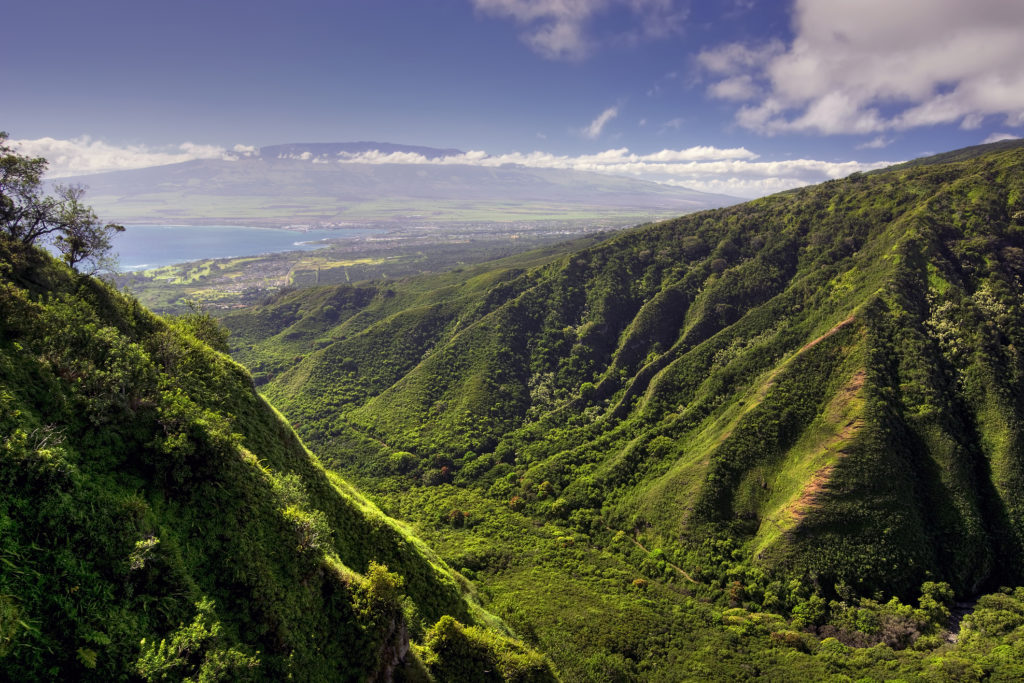
The view from Waihee Ridge Trail, over looking Kahului and Haleakala.
If you are visiting Maui between December and May, you can’t miss seeing the humpback whales. It is truly spectacular to witness these majestic creatures! On our most recent trip there, we spotted at least 30 (including babies!) during our week stay, often from the beach or driving down the road.
There are plenty of whale watching tours to go on, but if you want to save a buck, just keep your eyes peeled for whales anytime you’re near the ocean. Some of the best places to observe humpbacks are along the Auau Channel (named one of the top places in the world for spotting them!) and Kaanapali Beach in West Maui, and the beaches in Kihei, Wailea, and Makena in the South.
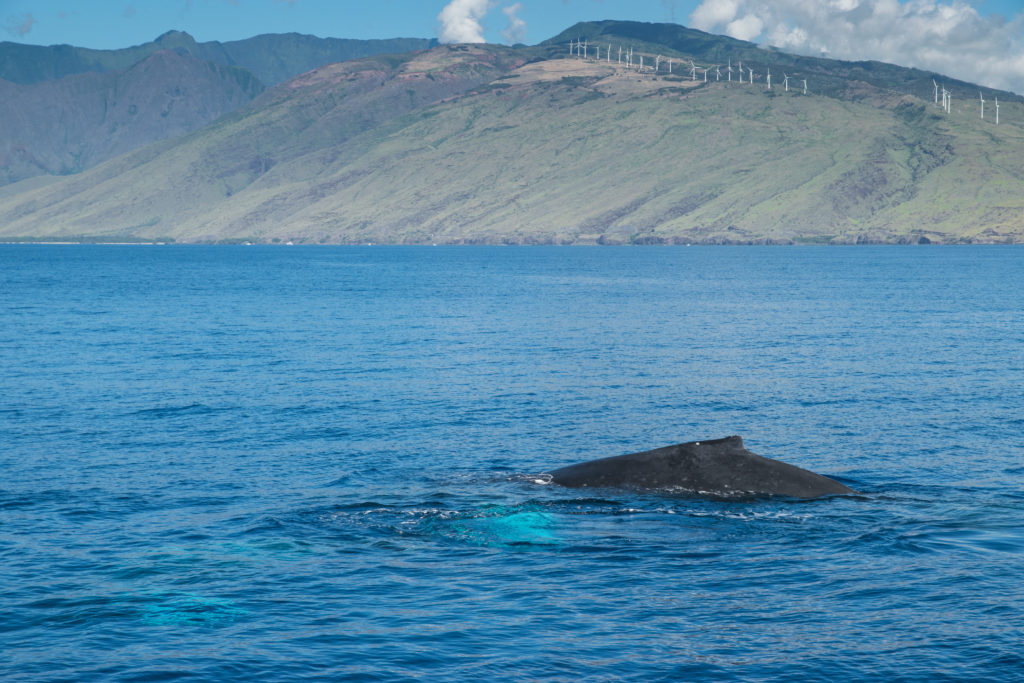
If you come to Maui in the Winter season, chances are high that you will spot humpback whales.
Maui is famous for world class surf, and if you’re here during certain seasons (Winter brings the hugest waves), watching the surfers at Pe’ahi Beach and windsurfers at nearby Ho’okipa Beach Park is a MUST! Some of these waves can reach up to 60 (or more) feet tall.
If you get lucky, you might actually time it when the famous “Jaws” mega-surf break hits the North Shore (consistently named the world’s biggest surf break). The lookout on the Pe’ahi cliffs above the break is one of the best vantage points to observe the surfers.
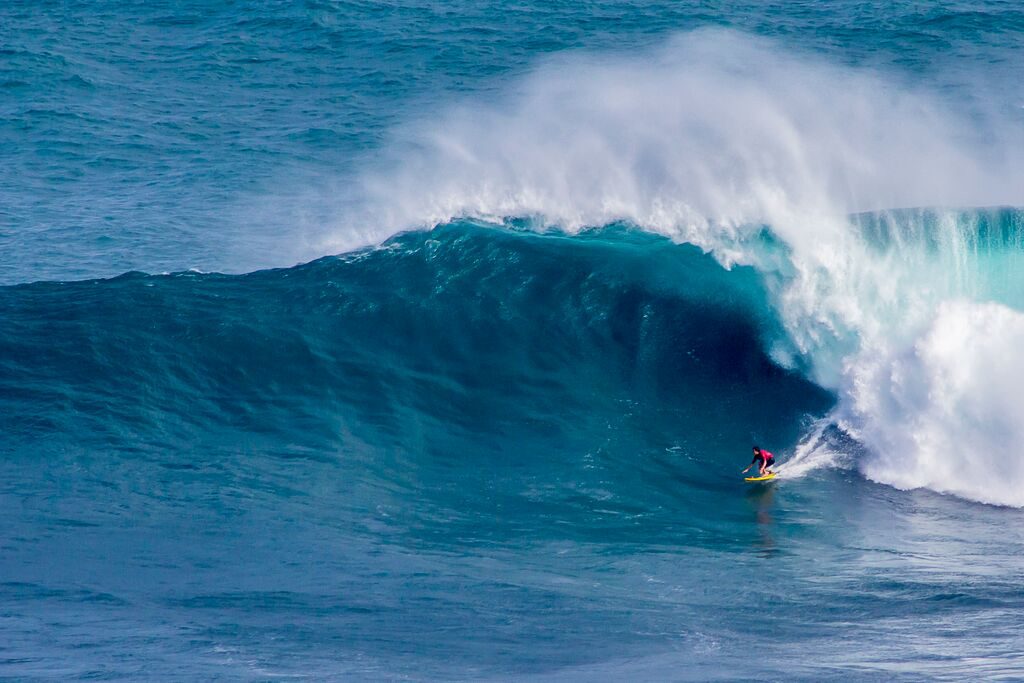
The famous “Jaws” brings the world’s best surfers to Maui for the biggest surf break on the planet. Photo courtesy of Maui Now.
If you haven’t tried paddleboarding yet, you’re missing out! Paddleboarding is one of the fastest growing outdoor recreation activities in the world and for good reason–it’s great exercise, it’s easy (you heard us right!), and most importantly, it’s FUN! While paddleboarding on a lake or a river is a good time, taking it out on the ocean is a whole new level of fun.
Yes, you can surf on a paddleboard and its actually easier than regular surfing. Maui has some of the best places for paddle surfing, perfect for beginners. For just a couple of hours, you can rent a paddleboard for cheap and be on the water in no time. Kihei Cove Park is one of the best spots for paddleboarding because of its consistent waves.
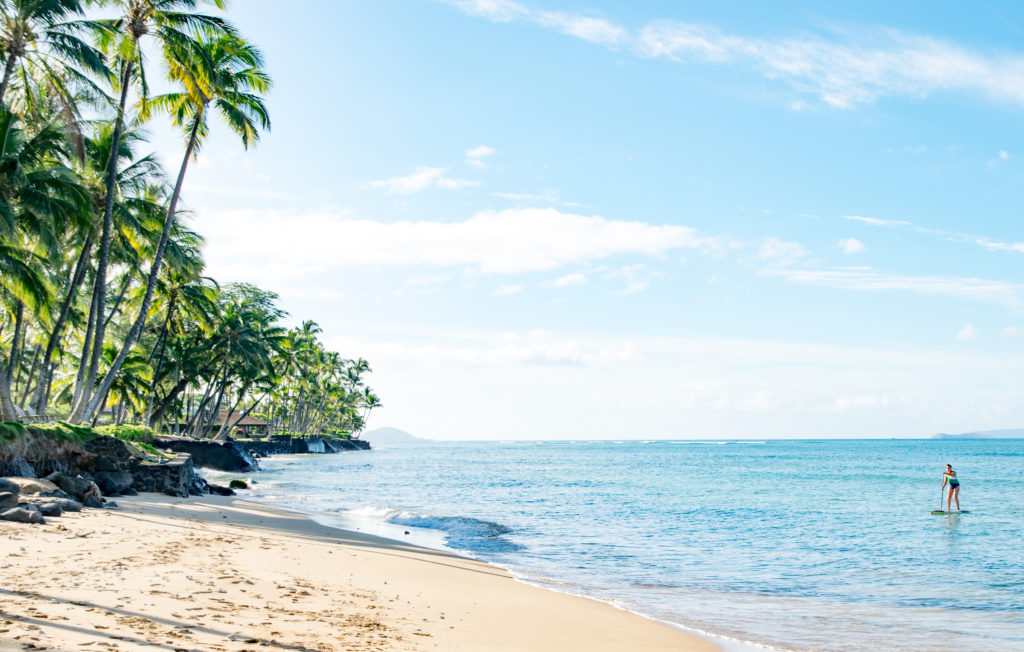
Paddleboard surfing in Kihei is the perfect place to master the basics.
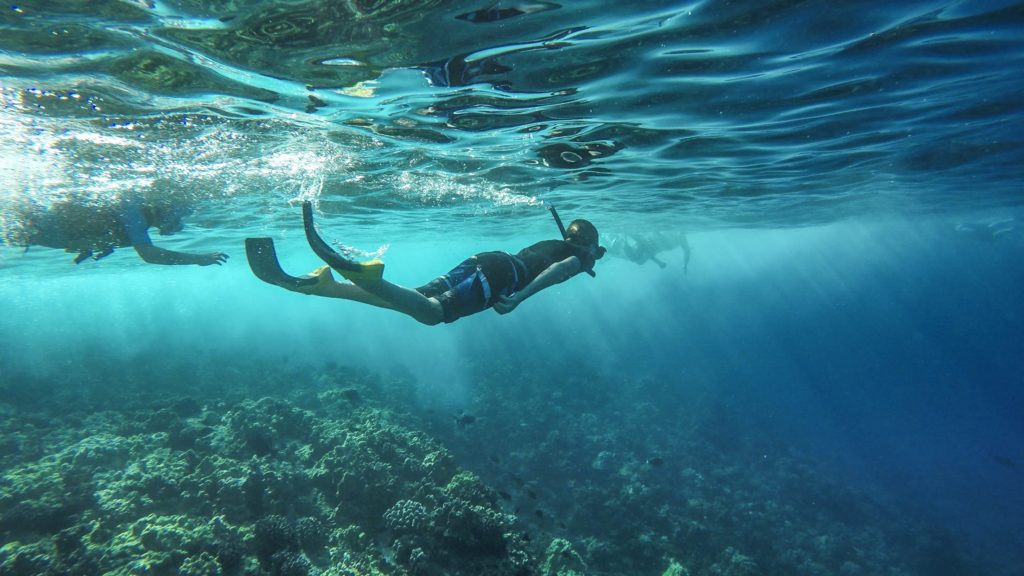
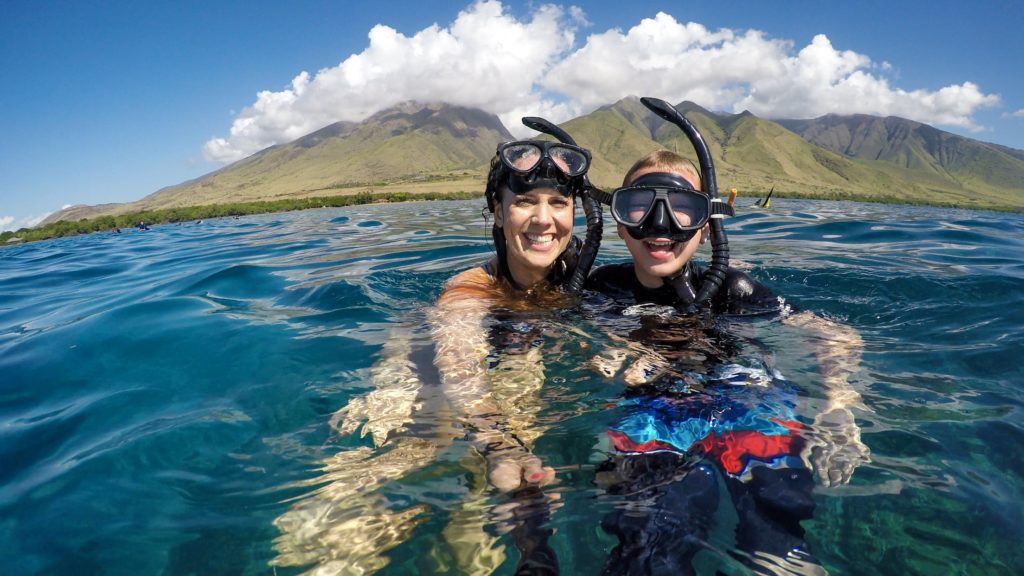
With such a diverse array of marine life, Maui is an underwater sanctuary waiting to be explored. Fortunately, Maui has plenty of great places to snorkel, even with young kids. It’s also free if you bring your own snorkel gear, or cheap to rent a mask, snorkel and fins while you’re there. We rented snorkel gear at Boss Frog’s Snorkel Rentals in Kihei, but they also have other locations on the island.
Some of the best spots to snorkel in Maui are Black Rock at Ka’anapali Beach (cliff jumping here is good too), Honoloa Bay (even the walk to the bay is an adventure!), Makena Landing (awesome for spotting turtles), and Kapalua Beach (our favorite for kids with its shallow depth and calm waters).
Snorkeling in the Molokini crater, Maui
For more advanced snorkelers (and strong swimmers), go no farther than Mala Pier (a local favorite and popular dive site) near Lahaina and La Parouse Bay, south of Wailea. If you go to La Parouse Bay, make sure to have water shoes as it is a rocky shoreline made up of lava rock.
If you want to venture away from the beach to snorkel, we would recommend going on a guided excursion to Molokini Crater and Turtle Town. Molokini is off the coast in South Maui and breeds an abundance of coral reef and fish. On our last trip there, we spotted 3 humpback whales within the crater, only 50 yards from our boat! Turtle Town is farther north, but a great place to find turtles (hence the name).
If you have young kids, most tour companies will provide a life jacket along with snorkel gear and or you can even try Snuba snorkeling.
Snorkeling at Turtle Town in West Maui
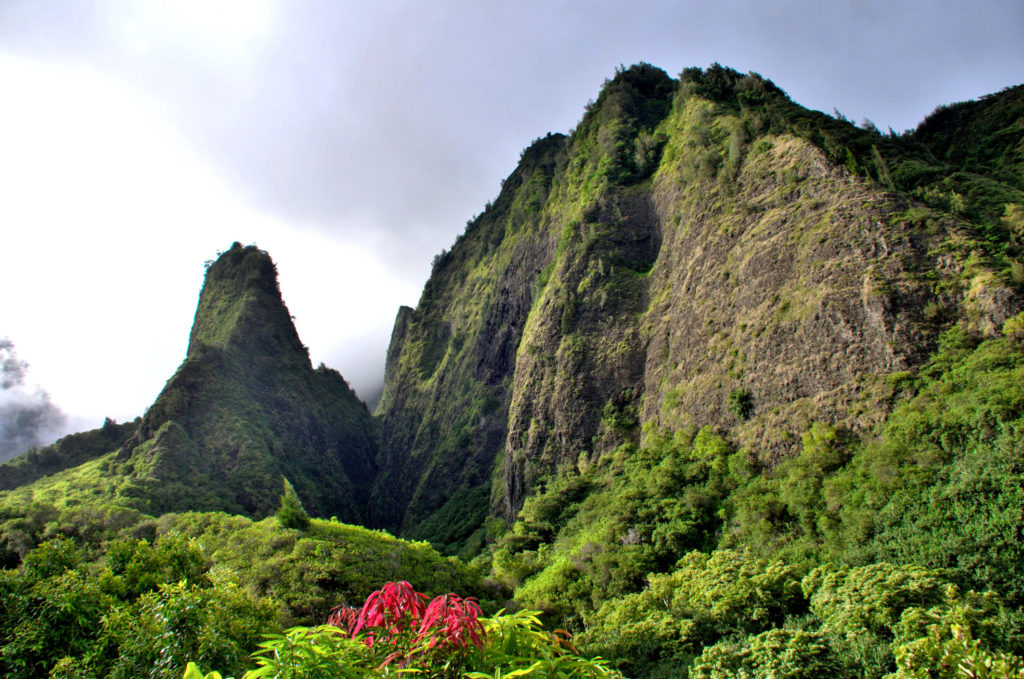
‘Iao Valley State Park is a garden oasis dripping with lush flora and fauna, rivers, waterfalls, and mountains. It’s also the perfect place to spend a day with kids! You can’t come here without hiking the ‘Iao Needle Lookout trail, which is a 1 mile round trip trail meandering through a botanical garden and adjacent to a stream. The ‘Iao Needle hike is consistently ranked as one of the top 10 hikes in Maui.
There are also 10 miles of additional hiking trails within this park if you meander longer. Parking is $5 with a $1 donation fee per person upon entrance. For a full day, bring a picnic lunch and enjoy cooling off in one of the many swimming holes and waterfalls after your hike in ‘Iao Valley State Park.
‘Iao Valley State Park, home to lush tropical foliage, mountains and valleys.
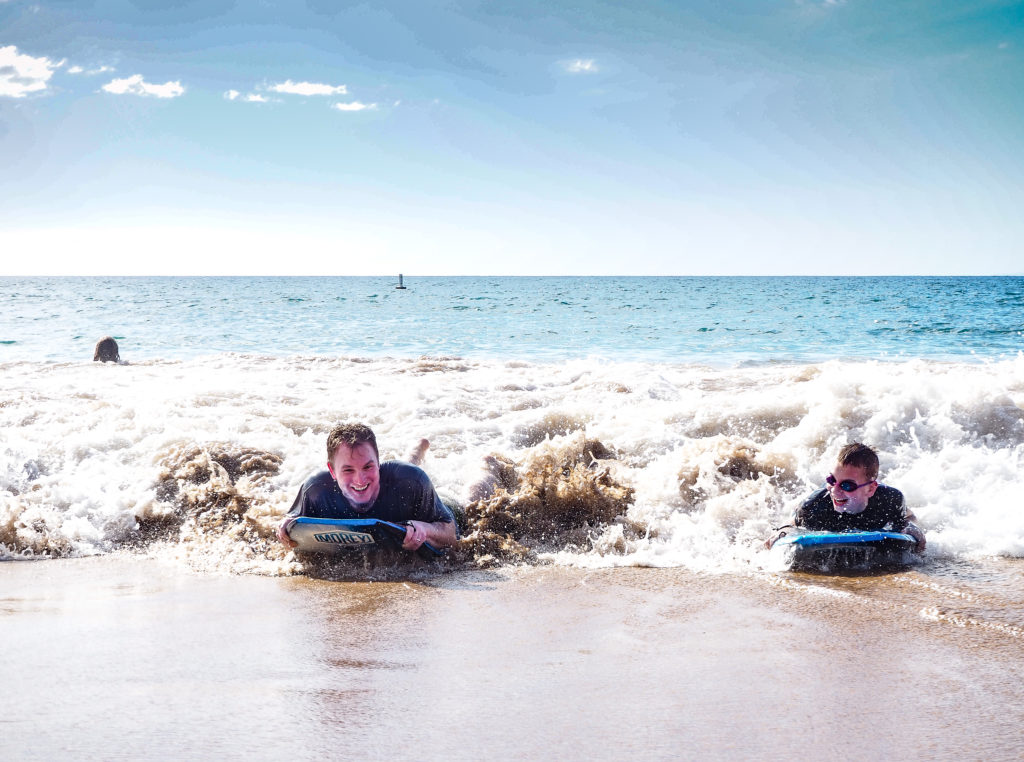
One of our favorite activities to do in Maui is boogie board and surf. There are so many amazing beaches with perfect waves for boogie boarding, even for small kids. In our opinion, the waves at Big and Little Beaches at Makena State Park, south of Wailea are some of the very best on the island.
You have to be careful here though, because there is often a rip-tide current. Luckily there are lifeguards on the beach to warn the swimmers and help prevent drownings.
Boogie boarding at sunset at Big Beach, Makena State Park.
Other great beaches to go boogie boarding are Kamaole Beaches in Kihei, Baldwin Beach in North Maui, and DT Fleming Beach Park in West Maui. Check out these surf beaches for beginners.
Kamaole Beach has smaller waves for boogie boarding, making it perfect for kids.
On our first trip to Maui we had planned on summiting Haleakala to witness the sunrise, but the roads were closed due to mud slides from a recent storm. The next trip though we made sure it happened, as this is the one experience that EVERYONE raves about in Maui.
Let us tell you, it did not disappoint.
The 3AM wake-up call to make the 2 hour drive to the summit (over 10,000 feet) was well worth the lack of sleep. Watching the sun rise up above the clouds is a spiritual experience and one of the most beautiful sights our eyes have ever beheld. Getting to Haleakala isn’t easy from most places on the island, so time it accordingly.
From most major areas in Maui, it takes 1.5-3 hours to reach the summit. Also, keep in mind that Haleakala is a national park, meaning there is a $25 entrance fee per car. As of February 2017, it is required to make a reservation ahead of time to see the sunrise at Haleakala.
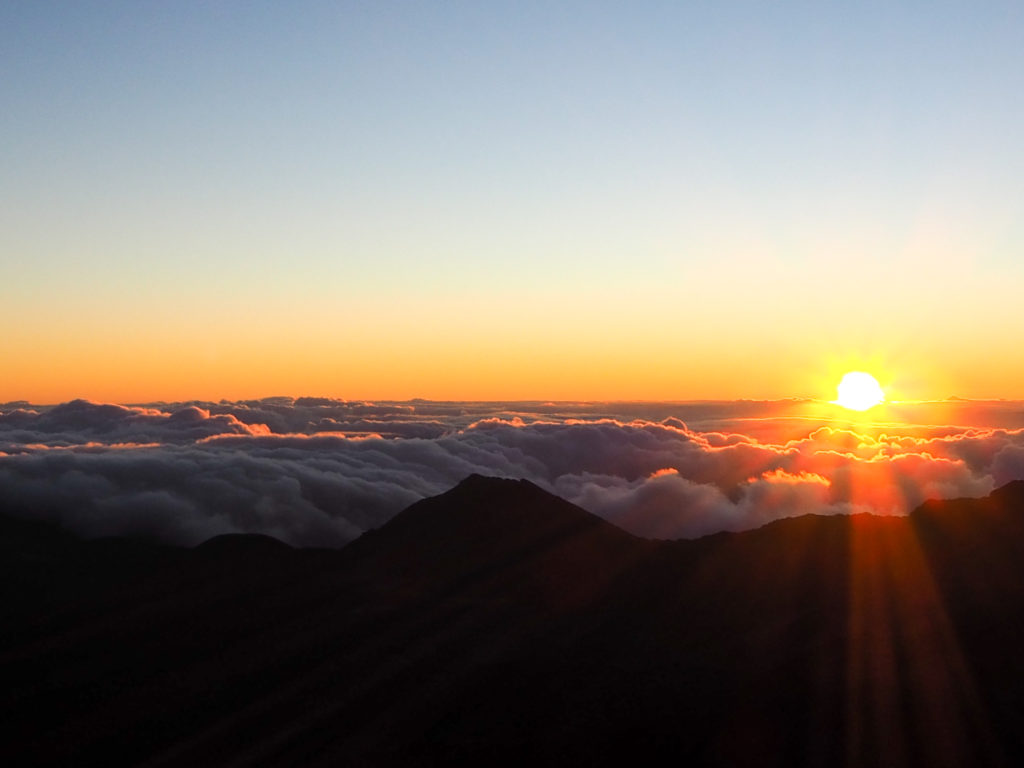
Witnessing sunrise at Haleakala is a must-do on Maui and a spiritual experience.
We would advise you get here at least an hour before sunrise. Why? Because it will be crowded with other tourists. You will want to get a “prime” spot to witness the sunrise (especially for photos), so arriving early is a smart. Also, bring lots of warm layers. Yes, it is a tropical island, but on top of the volcano it is cold (and often windy), especially in the wee hours of the morning with temperatures dipping into the 30’s.
If you want the ultimate Haleakala experience, combining the sunrise with a thrilling downhill bike ride is the way to go. This isn’t free unless you have your own bike, but it is worth every penny. We did the Sunrise Special tour with Bike Maui, as it allows kids over the age of 8 to ride. We met our guides at the bike shop to get outfitted with bikes and helmets, transported to the summit to watch the sunrise, and then descended the 23-mile downhill route that took us from 10,000 feet back down to sea level.
The great thing about this tour is you go at your own pace, so we stopped at fruit stands along the way, picked macadamia nuts and grabbed lunch in a cute town before returning our bikes to the shop.
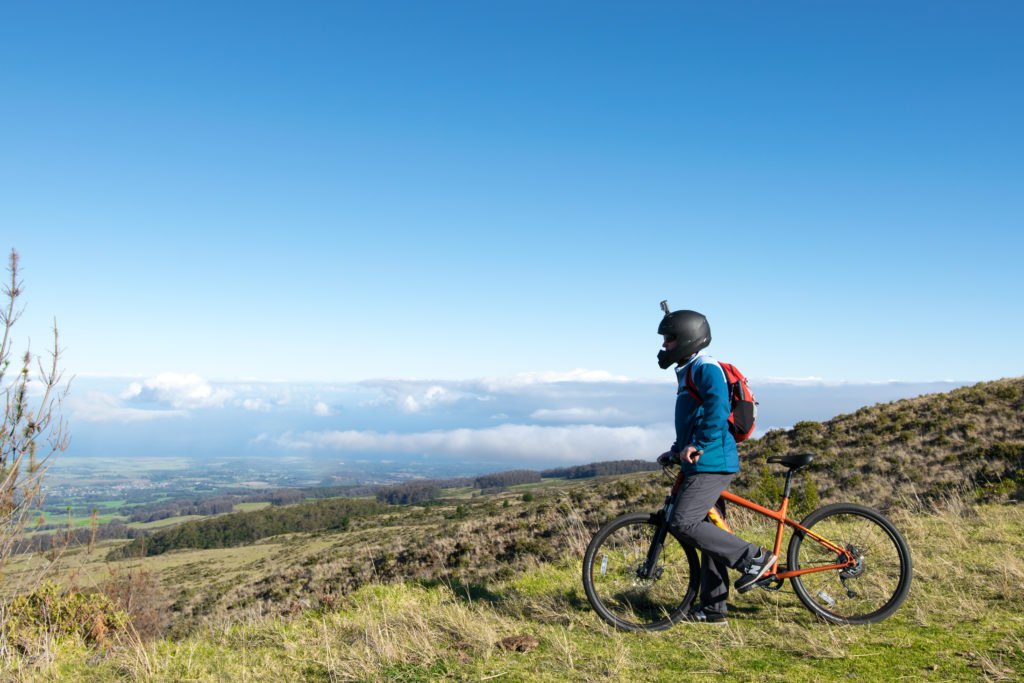
Biking down Haleakala is both a thrill and a feast for the eyes.
It was tough to decide what our #1 outdoor adventure in Maui would be between watching the sunrise at Haleakala or driving the Road to Hana, but ultimately, we are claiming the latter because exploring the Road to Hana is the quintessential Maui experience. It is also the undisputed top attraction in Maui. Driving the Road to Hana is an adrenaline-packed adventure in itself, with hairpin turns along a windy and narrow road hugging the dramatic coastline.
You’re also rewarded with the best scenery that Maui has to offer–waterfalls galore, thick bamboo forests and hiking trails, swimming holes, and stunning beaches and vistas. This is the side of Maui that you have to see if you visit the island.
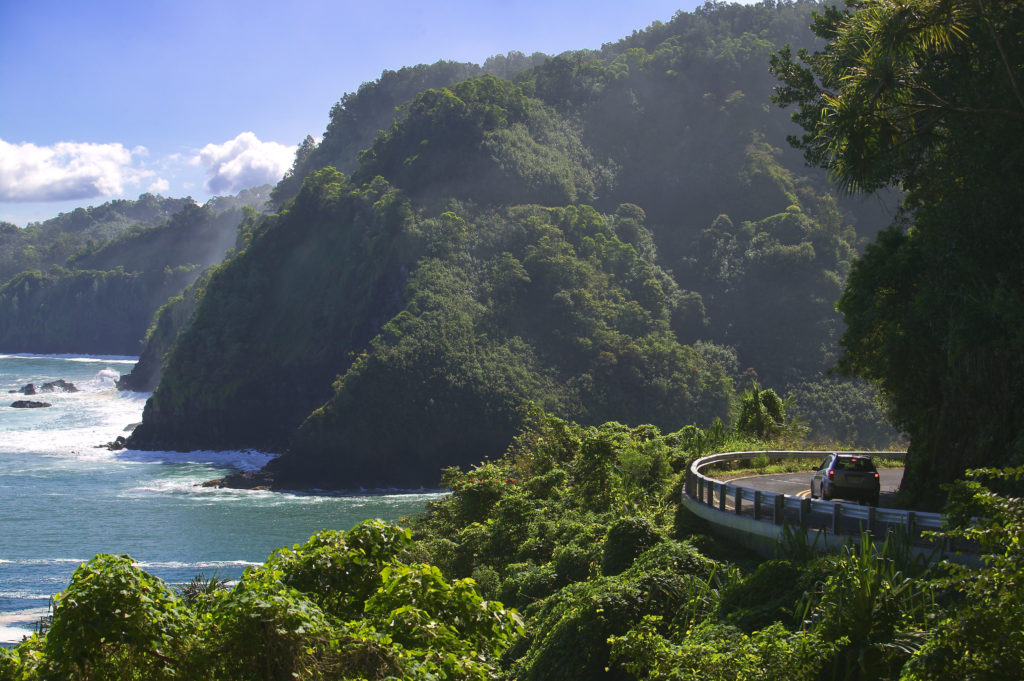
The Road to Hana is quite the adventure and exploring this undeveloped side of Maui is like stepping back in time.
There are so many great comprehensive Road to Hana guides filled with valuable information that we won’t cover it all here. We will, however, include our picks for the best stops along the Road to Hana along with a few very important tips you should know about driving the Road to Hana. Here are some of our favorite, note-worthy stops along the Road to Hana:
Twin Falls (mile marker 2)
These waterfalls are beautiful, but be warned, they can also be crowded. We suggest getting here early in the morning, preferably before 10AM so avoid the tourists. There is also a large swimming hole here too. Twin Falls is about a 1 mile round trip hike on a paved path.
If you get here early, you can find these falls and swimming hole all to yourself.
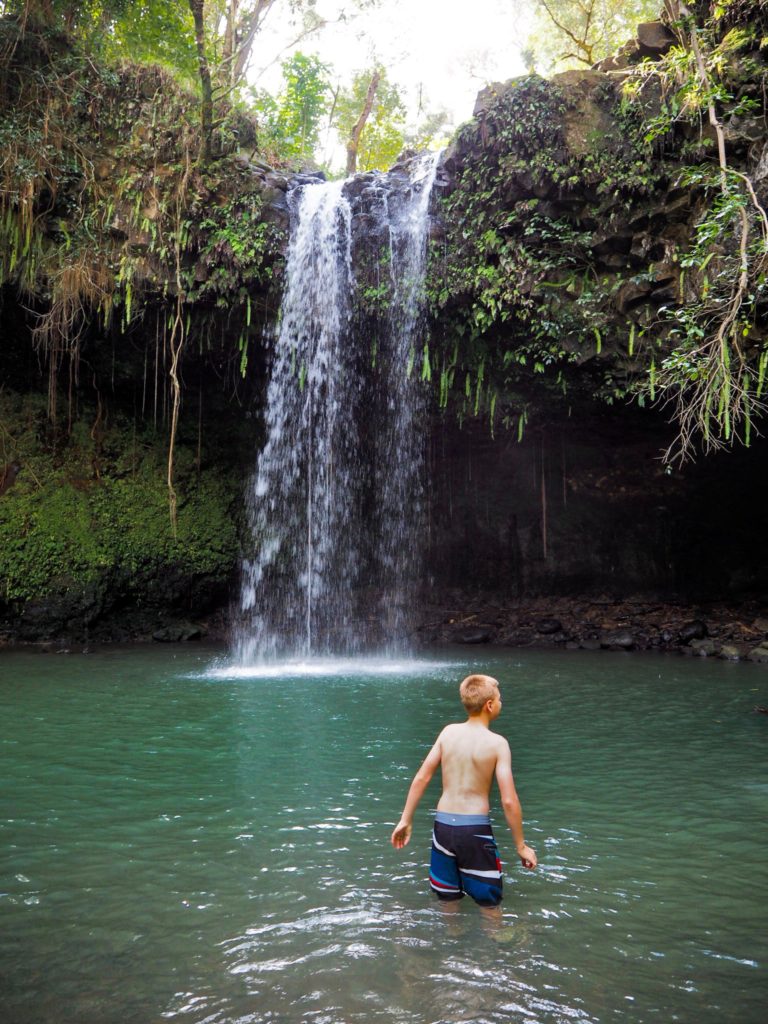
Waikamoi Falls/Upper Falls (mile marker 9)
The trail to Waikamoi Falls is a very short hike off the right side of the road (there is a small pull-out just before the bridge where you can park). You will find a fun rope swing here and cliff jumping off the side of the waterfall. Make sure to follow the trail up the river to the upper falls.
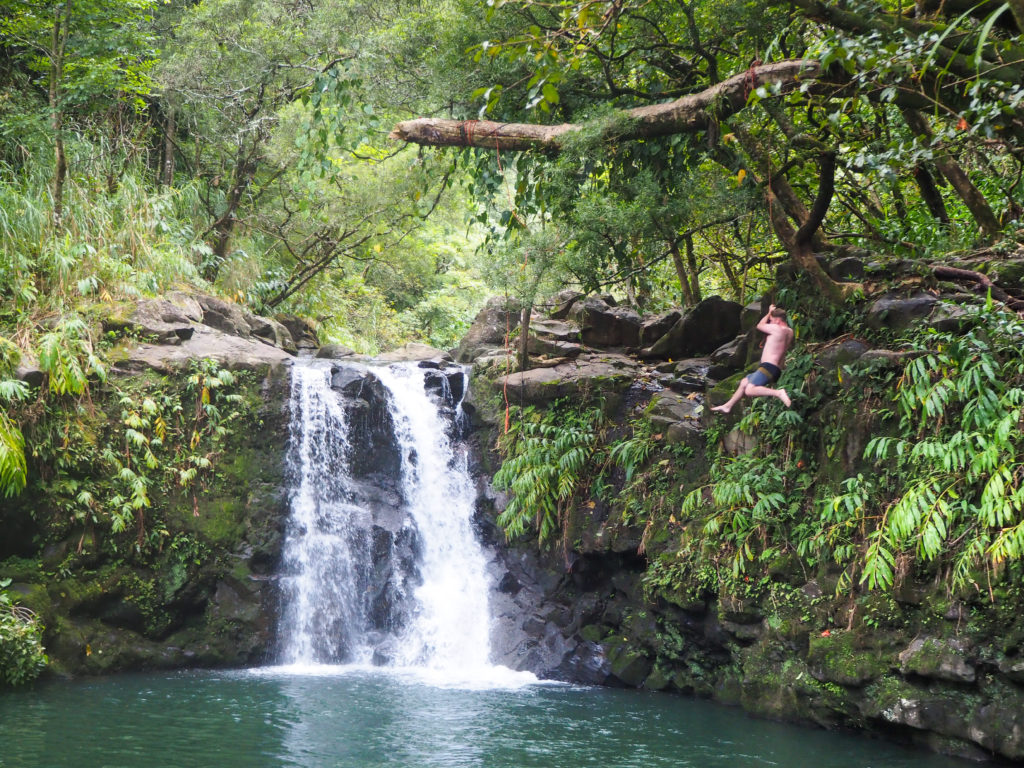
You can’t resist the rope swing at Waikamoi Falls on the Road to Hana.
Making the short trek to Upper Falls is worth the extra effort.
Ke’anae Peninsula (mile marker 16-17)
You will know when you reach the Ke’anae peninsula, because the views are out of this world. The coastline is rocky and exposed to the elements, so you won’t find any swimming opportunities here, but it’s worth a stop for a few photo opps and perhaps a stroll through the arboretum. This is also the halfway mark to Hana. Make sure to stop and buy some banana bread, it will be the best you’ll ever have!
The Ke’anae Peninsula is a dramatic coastline along the Hana Highway.
Upper Waikani aka Three Bears Falls (mile marker 19)
Upper Waikani Falls are popular due to being situated like a drive-thru right on the road. Most people drive up and snap a photo and drive off, but if you want more than just a drive-by view, continue about 1/10 mile past the falls where there is a small parking area.
Waianapanapa State Park (mile marker 32)
You’ve probably seen photos of the black sand beaches in Maui. Well, what you’re seeing is part of Waianapanapa State Park. The area of Wai’anapanapa is filled with history, legend, and picturesque views. There is a loop trail that will take you down to the fresh water caves where some fascinating legends live.
Also, there are caves on the beach for exploring and camping for those that plan ahead (permit required). If you have time to explore, check out this blog post on 7 must-visit sites in Wai’anapanapa State Park.

Waianapanapa State Park is famous for its black sand beach and secret caves.
Hana (mile marker 34)
You’ve made it to the town of Hana! If you reach Hana, you’ve already seen some incredible scenery, however you know the saying, “Save the best for last”? Well, the best of the Road to Hana is just past Hana. This is why it is recommended to drive the Road to Hana in two days (staying a night in Hana) and not just one.
You can also camp here if you think ahead and get a permit. This way you’re not rushing the experience and you’re able to fully enjoy and soak in all the beauty of this side of Maui. In Hana, a definite must-stop is Braddah Hutts for the best roadside BBQ!
Kaihalulu Beach aka red sand beach is also right in Hana. Getting there can be confusing, so make sure to park on Uakea Road right in front of Hana School and across the street from the ballpark. Then proceed to walk towards the dead end where there is a hotel and across the field and to your left, you will find the trail down to the beach. Use caution on the trail as it is slippery.
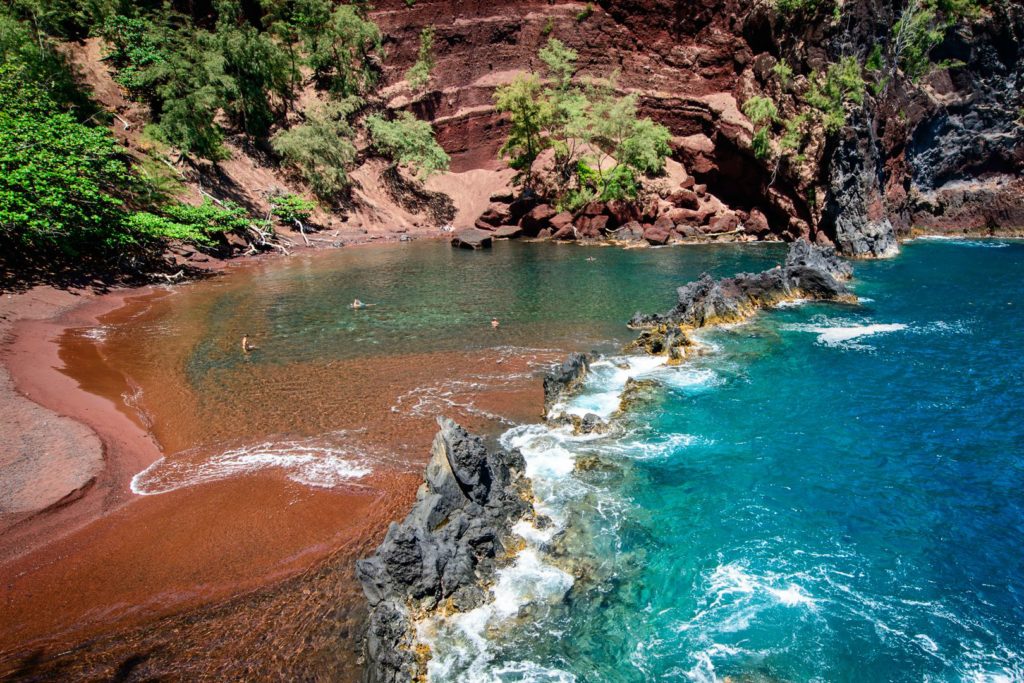
The famous red sand beach right in Hana is tricky to get to, but worth the trek down if you’re careful.
Hamoa Beach (mile marker 50)
You will notice that if you drive past Hana, the mile marker signs start counting down again. Pay attention to this, because Hamoa Beach is found just past the town of Hana at mile marker 50. This beach is consistently ranked one of the most beautiful in all of Maui, so stopping here to relax at the beach and take a dip is well worth it.
Hamoa Beach is located near the town of Hana and is about picturesque as they come.
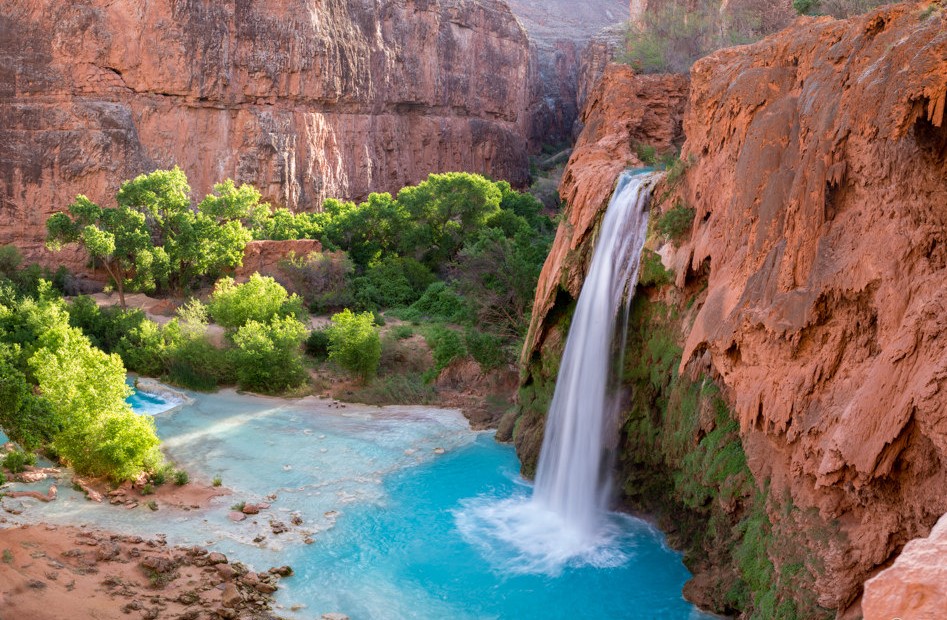
Waioka Pond aka Venus Pools (mile marker 48)
Probably one of the most talked about stops along the Road to Hana is the Waioka Pond, otherwise known as the Venus pools. You could spend hours here because this is cliff jumping paradise! To find Waioka Pond, park across the street from mailbox 27, hop over the stone fence and walk along path through the metal fence. There you will continue on the trail to the Venus pools.
Cliff jumping at its best at Waioka Pond. Photo courtesy of Aloha from 808.
Wailua Falls (mile marker 45)
Wailua Falls is a beautiful waterfall easily accessed right off the Hana highway. You can see these falls from the road, however it’s worth getting out of the car to get some photos or to explore the small cave and pool at the bottom of the falls.
Wailua falls is located just off the Road to Hana.
Ohe’o Gulch and the Pipiwai trail (mile marker 42)
Saving the very best for last along the Road to Hana are the pools of Ohe’o, also known as the Seven Sacred Pools and the famous Pipiwai trail, both part of the Haleakala National Park system. *Take note that Ohe’o Gulch is currently closed due to rock slides in the area, but be sure to check out the NPS website for the most current status before you go.

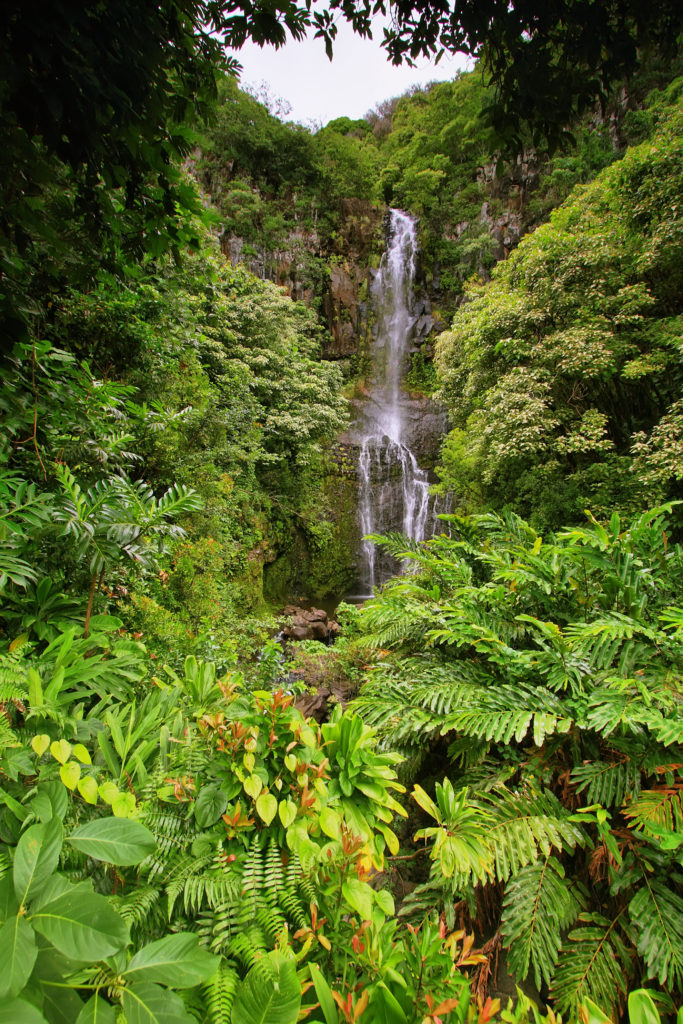
The Pipiwai trail goes through a dense bamboo forest, leading to the famous Waimoku Falls.
By far the best hike in all of Maui (and also listed as one of the top hikes in all of Hawaii) is the Pipiwai trail to Waimoku Falls, a 4 mile round trip hike to the foot of a 400 foot waterfall. The hike itself is such a treat because you walk past an enormous Banyan tree and through an incredible bamboo forest, before reaching Waimoku Falls. Along the trail, you will also spot Makahiku Falls, an impressive waterfall cascading 200 feet down.
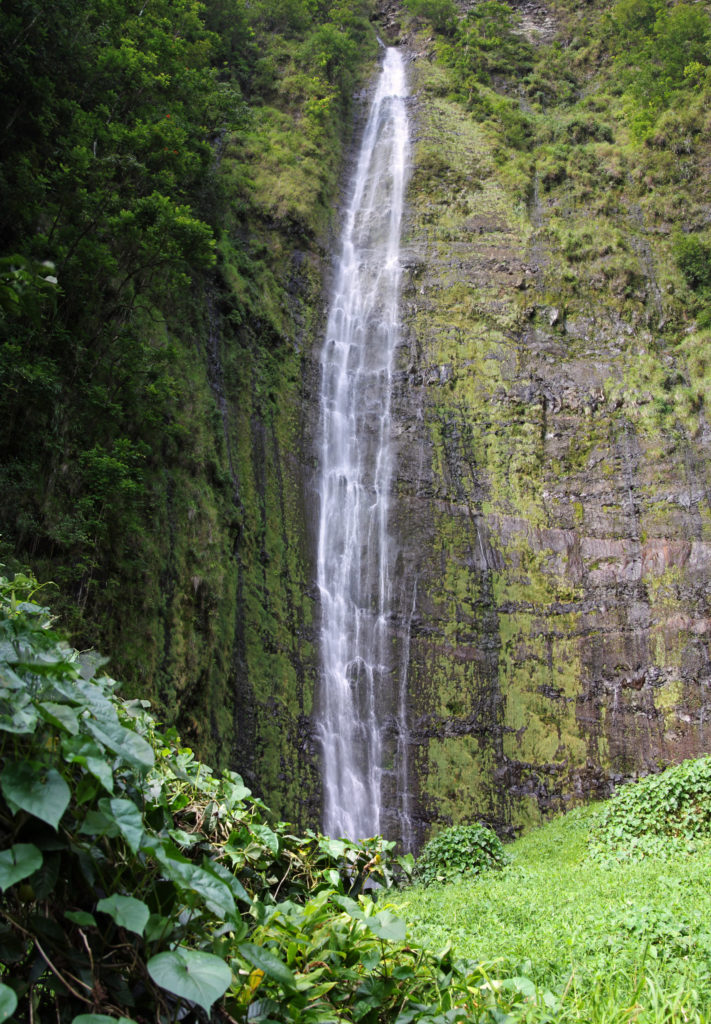
At the end of the Pipiwai trail, you are rewarded with the gorgeous Waimoku Falls.
Maui is one of those places that you could return to over and over again and always find new places to explore–you just never get bored here! If you want to island hop over another Hawaiian island, definitely make sure to check out Kauai, it’s our favorite island for hiking and has some of the most breathtaking scenery you’ll ever witness.
Havasuapai is truly an oasis in the middle of the desert. The best way to describe this magical place is to say that if the Grand Canyon and Hawaii had a baby, and they would name it Havasupai. Decades ago, this place was almost unheard of, but thanks to this digital era (and social media!) in which we now live in, Havasupai is world famous and highly sought-out as an adventure destination.
And for good reason–it’s remote, breathtakingly beautiful, and an adventure just getting there. This will be one place you will want to return to over and over again. That’s why we put together the ultimate guide to hiking Havasupai with kids.
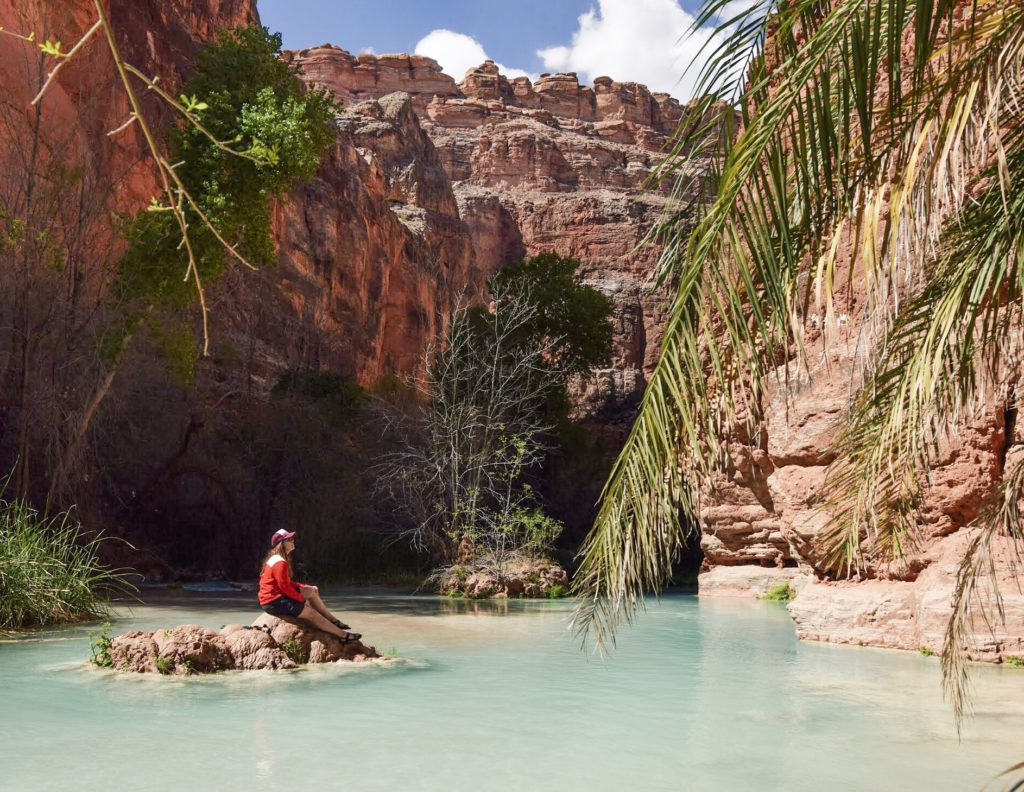
It’s hard to believe that this place exists and yes, the water really is that blue!
We’ve created this guide for hiking to Havasupai, specifically with kids in mind, because when we were planning this trip, we didn’t find a lot of helpful information out there on doing this hike with KIDS. We also want to show parents that making the trek to Havasuapai is do-able with children of all ages if you just plan and prepare ahead. This guide can also be useful for anyone wanting to make the trek though, especially if you’re a first timer and a little intimidated by it all.
Below you will find some valuable information on hiking Havasupai with kids, to include our top tips, basic info to help you plan (such as securing permits), as well as a complete packing list. We also have included a couple of sample itineraries depending on how many days you decide to go for.
Trekking across Beaver Falls
Let’s start with the basics. How does one get a coveted permit to hike to Havasupai? This in fact, might be the most difficult part of the trek, being that permits are a hot commodity and in the past, nearly impossible to secure. Well, thanks to an online reservation system started by the Havasupai tribe in 2017 (who owns and manages the land), you can now book permits online! What’s the catch?
Because only a limited amount of permits are given each day, and because they are in high demand, it is best to reserve permits on the first day of February for that following year. For example, let’s say you want to book permits for June 2019. You would need to get online on Feb 1, 2019 at 8AM PST to reserve a spot for your desired dates (it might be a good idea to have some back-up dates too).
Keep in mind that permits for the entire year usually sell out within 20-30 min, so it’s best that you get online at 8AM on the dot! Also, make note that a 3 night minimum stay is required, no day hikes allowed.
For pricing, refer to the Havasupai reservations website. Also, if you don’t want to carry your gear, you can reserve a pack mule or helicopter to haul down your gear. We recommend using the helicopter to haul gear if you’re concerned about the animal’s welfare and also it’s cheaper!
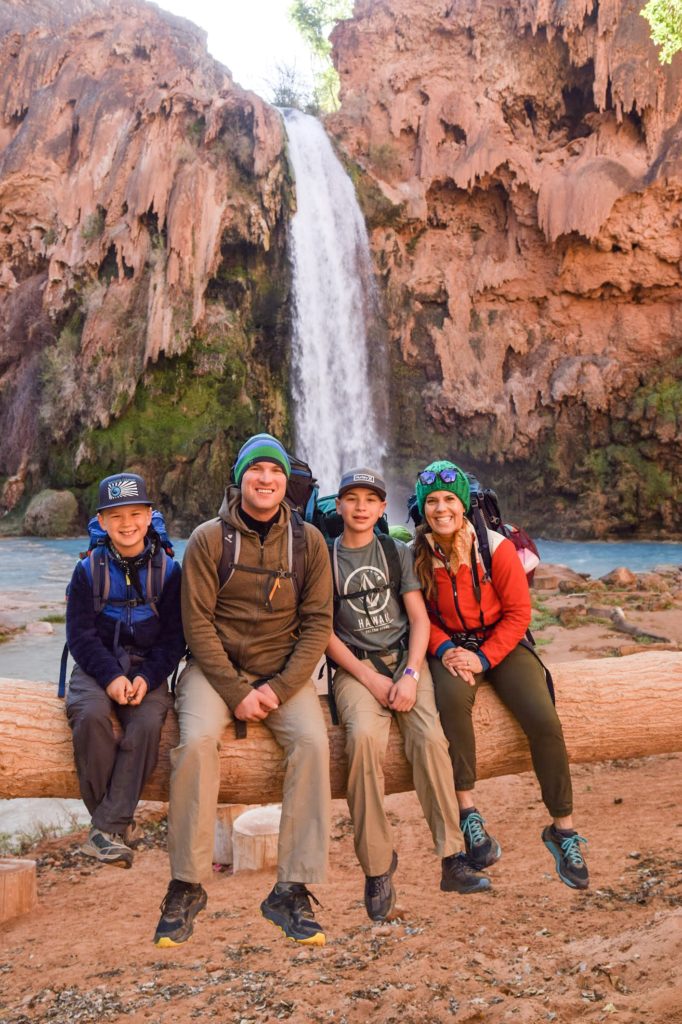
Enjoying the view at Mooney Falls.
The next hardest part in planning a trip to Havasupai is deciding on what time of year you want to go. Personally, we feel early Spring (March-April) or late Fall (Oct-Nov) is best if you want to avoid super hot temperatures (hiking in the heat is no joke!). If you go this time of year you will most likely encounter pleasant hiking temperatures, and the water stays about the same temp all year (right around 65 degrees), making it still nice to swim.
With that being said though, going in the Summer has its advantages too. Because it’s so hot outside, the water feels even more refreshing to swim, relax and wade in.
However, if you choose the warmer months to make this trek (May-Oct), it is advised to start super early (before the sun comes up) in the morning to make the trek down. (*Note: The hike from the parking lot/trail head to the village of Havasupai is approx 8 miles one way, and another 2 miles to the campground, so plan accordingly.) If temperatures are expected to exceed 100 degrees, many people start in the middle of the night to avoid hiking in the extreme heat where dehydration is common.
The trail to Havasupai follows the creek after the first 6 miles or so.
Now, let’s talk about the hike. The trek to Havasu Falls is an adventure in it of itself. But first, do you have to hike? No! If you are physically unable to make the 10 mile trek to these falls, you can opt to reserve a ride on a helicopter if you want (one or both ways). Go here for directions on how to get to the Havasupai trailhead from Phoenix or Vegas (the closest major US cities).
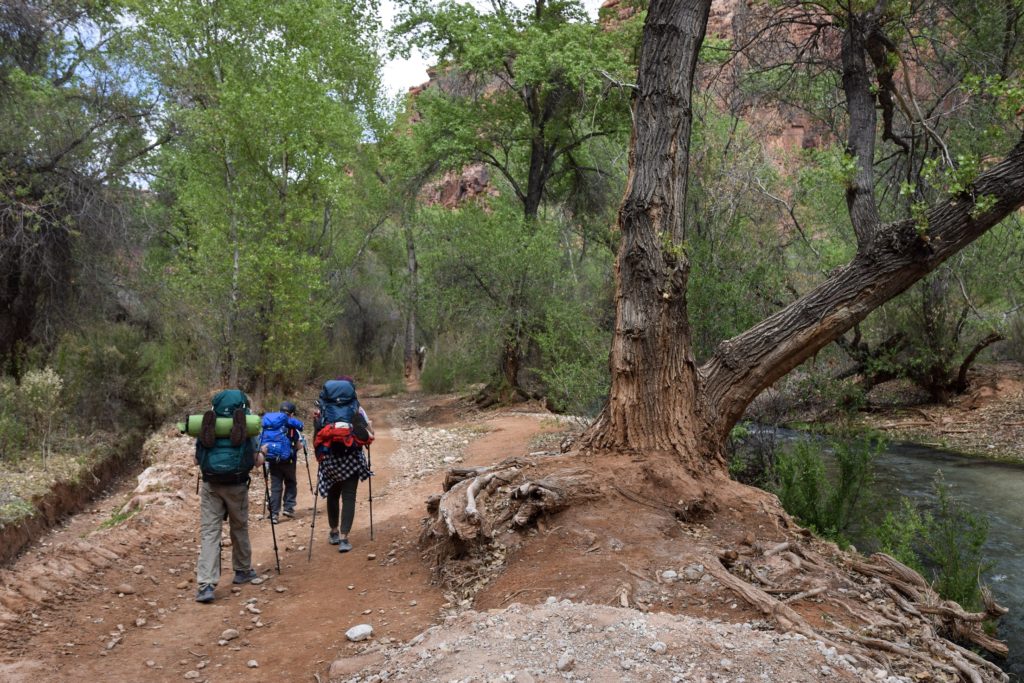
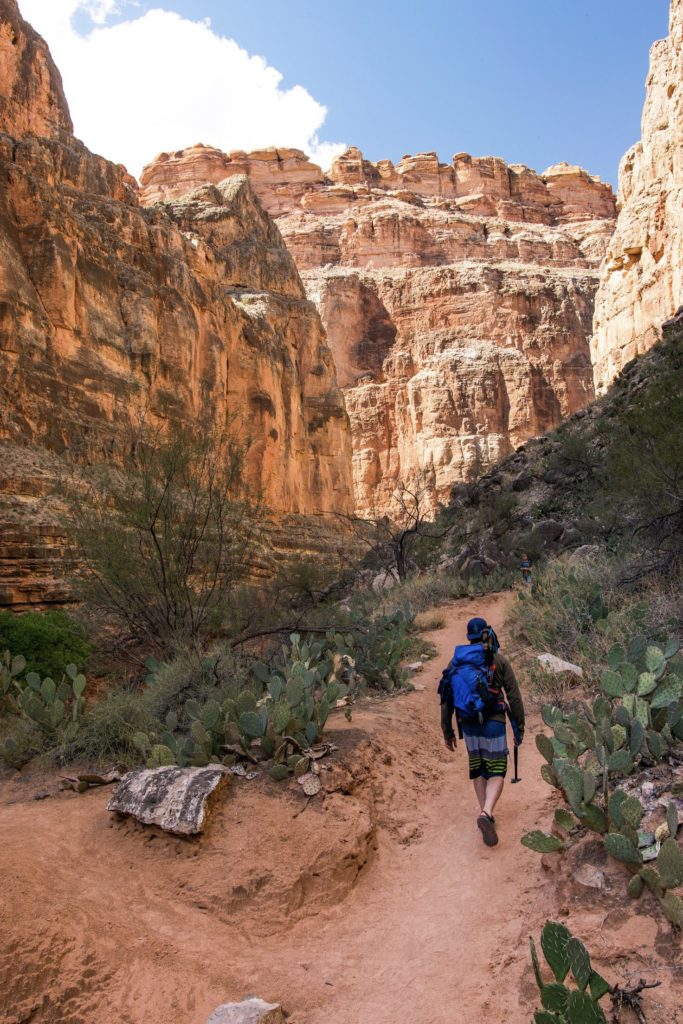
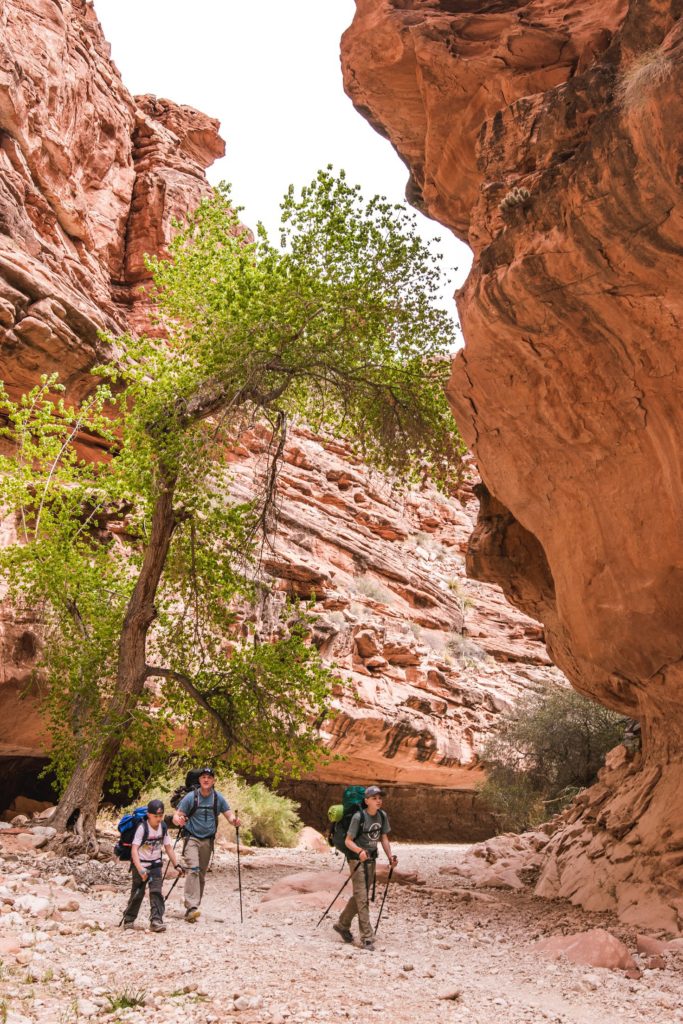
But honestly, we think that the hike is well worth the effort (it is stunning the entire way!) and it makes for an accomplishment that you will never forget! The trail itself is only steep for the first 1.5 miles from the trail head going down the switchbacks. After that, the hike is pretty level with a slightly downhill slant.
So, if you consider that, hiking in is fairly easy especially if you pace yourself and take breaks every once in awhile. Hiking out will be a bit more difficult as you will do all the uphill leaving Havasu Falls back to the parking lot (climbing around 2400 feet in 9 miles). The trail is mostly rocky and sandy, so good shoes are a must. We strongly recommend hiking poles (even for the kids!), which will help you balance and hike more efficiently, while conserving energy.
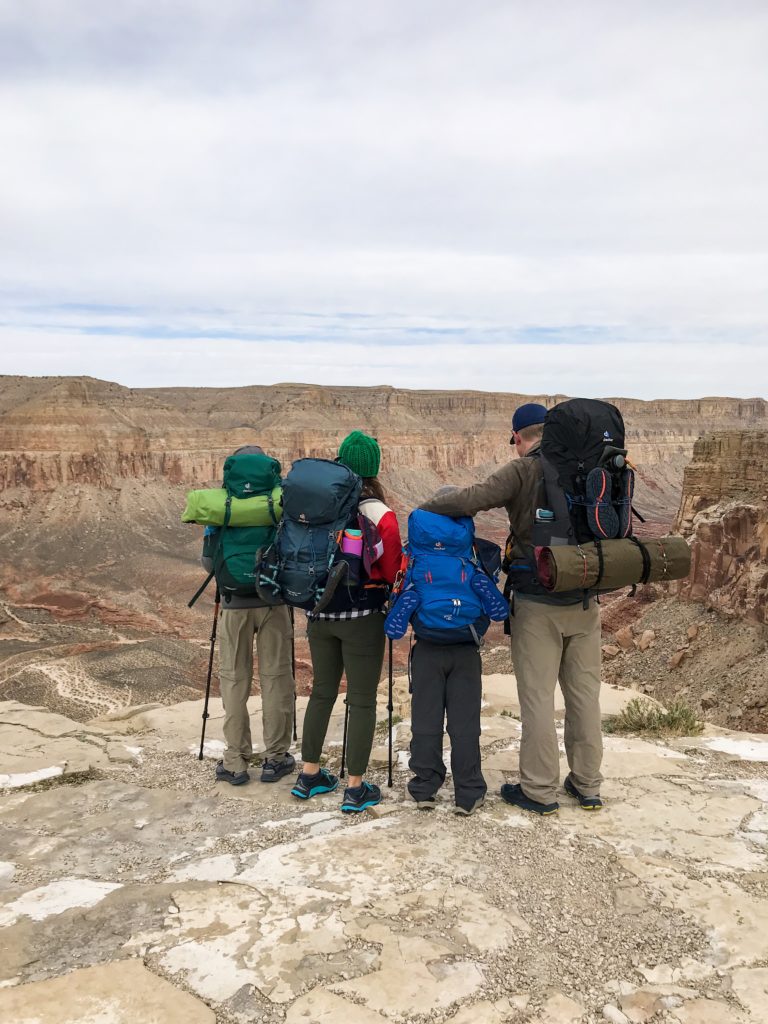
The start of the trail head, looking down the canyon.
As mentioned previously, it is 10 miles to reach the campground, so plan on it taking the majority of your day to get to/from the campground. There’s no water for the first 6 miles and daytime temperatures from May through September are often above 105 degrees Fahrenheit in the shade, so make sure you pack plenty of fluids. Once you reach the creek, you can filter water with your water filter.
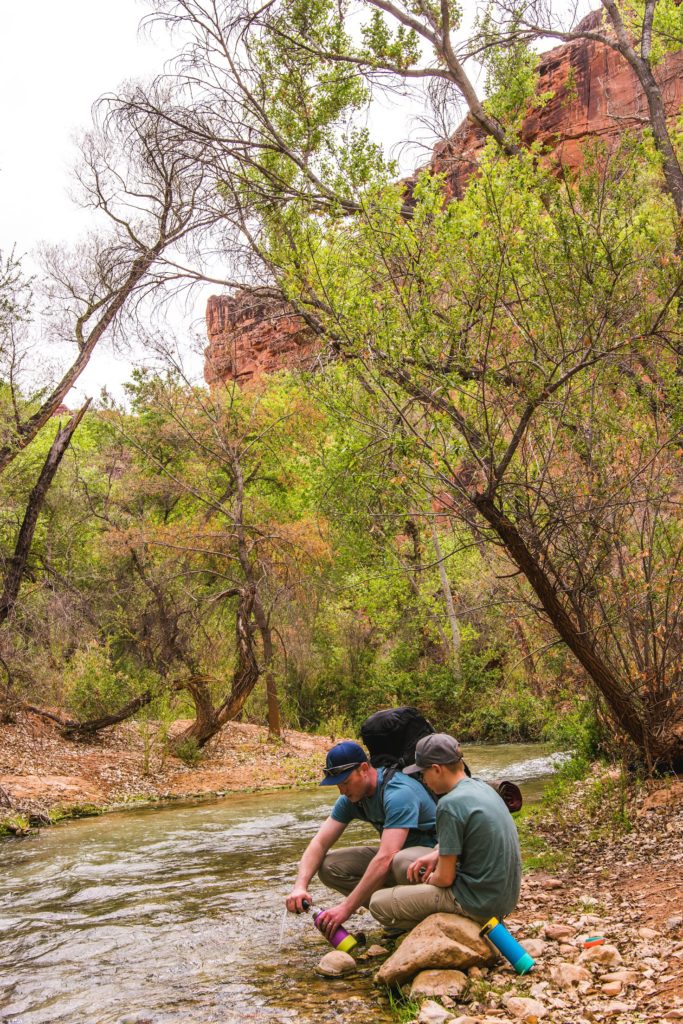
Filtering water at the creek. Because the water stays around the same temperature all year, it’s not super cold drinking water, but it’s what you’ve got!
When hiking with kids, whether you are carrying them or not, it’s important to stop often for rest breaks and snacks. Staying fueled and hydrated is super important on the trail! If your kids are carrying packs (more on that later), it’s even more important that you stop and let them take their packs off to rest a bit. We suggest taking a break each mile, or choosing a landmark up ahead to stop.
Keep rest breaks relatively short–10 to 15 min. In general, the longer you rest, the harder it can be to resume hiking sometimes (especially if you are sitting down) since muscle cramps can occur easily if you’re not careful. Check out our post on tips for hiking with kids to help your kids on the trail, while also making hiking more enjoyable for the whole family!
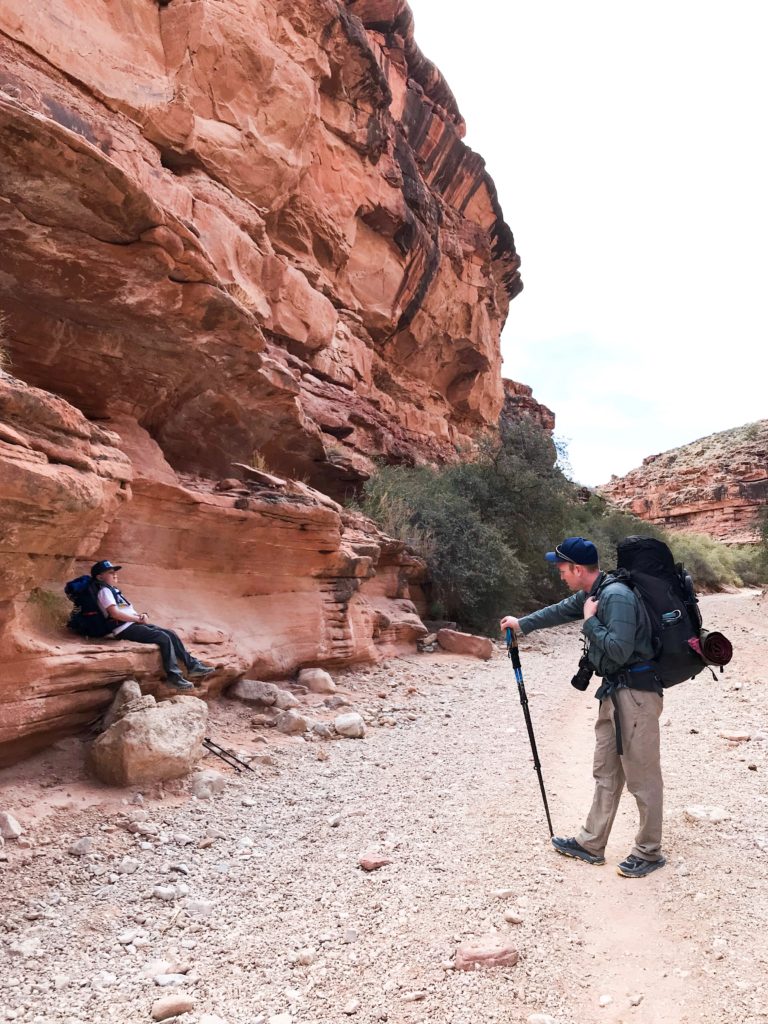
Breaks on the trail with kids are necessary to rest tired legs. Have some snacks or treats , such as gummy bears or sour patch kids as a good motivator!
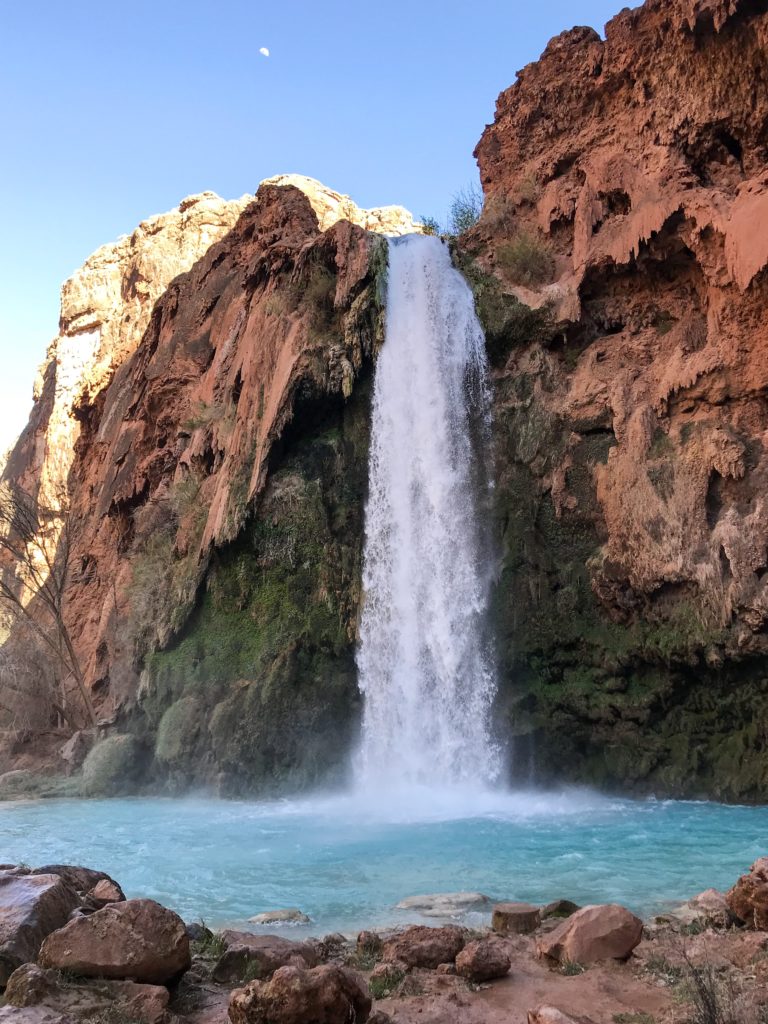
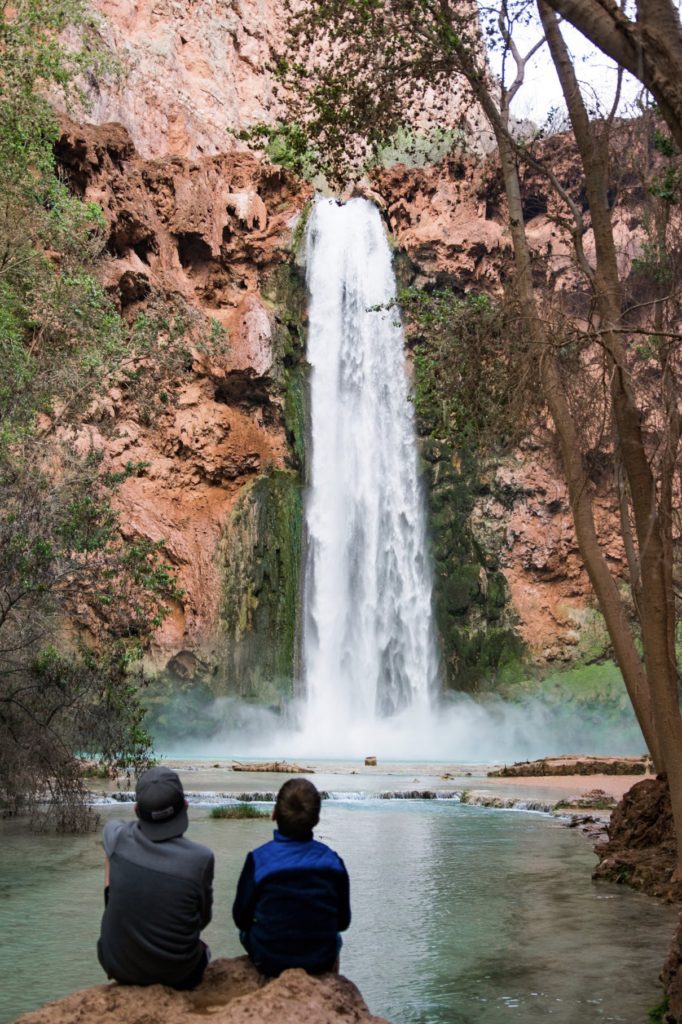
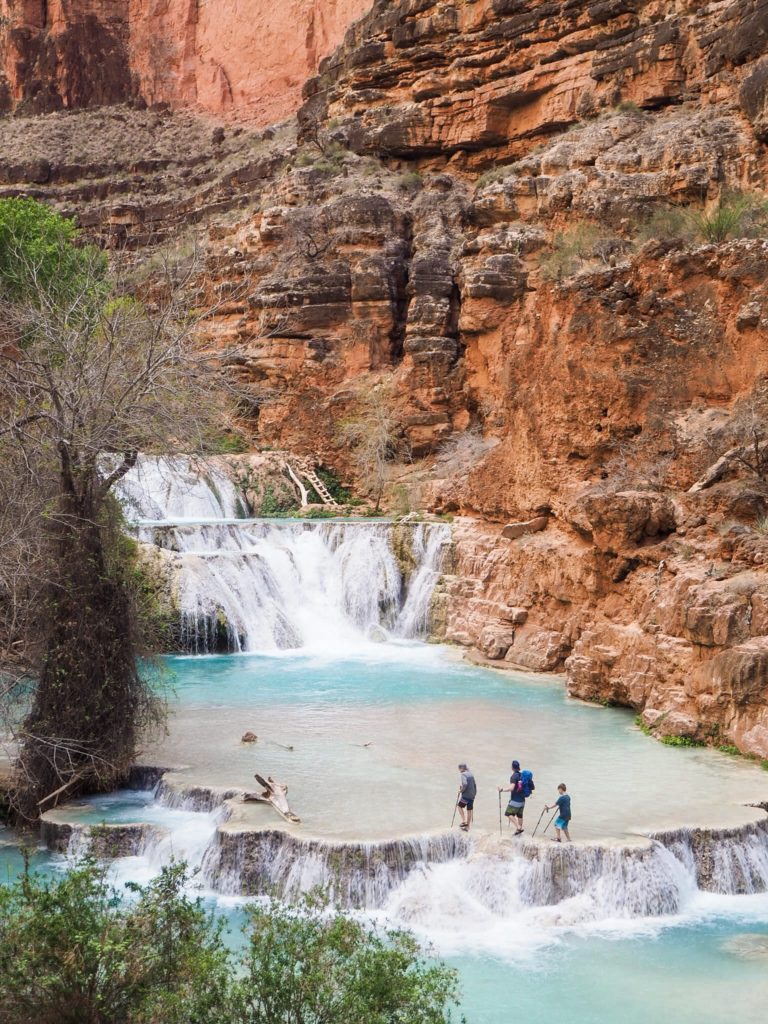
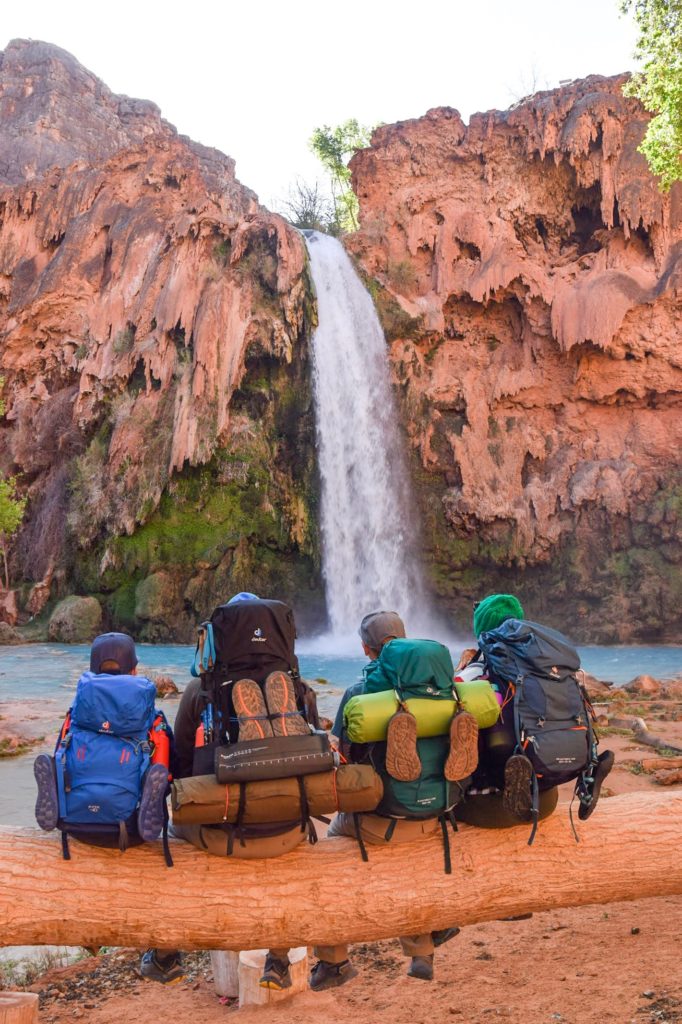
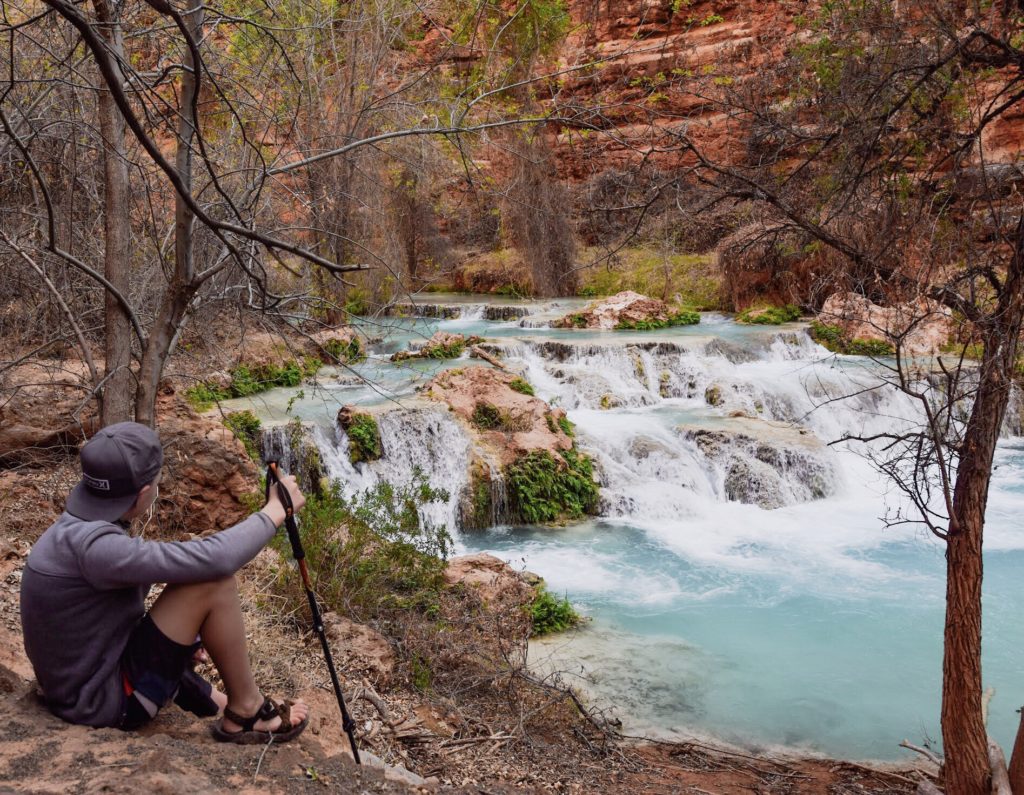
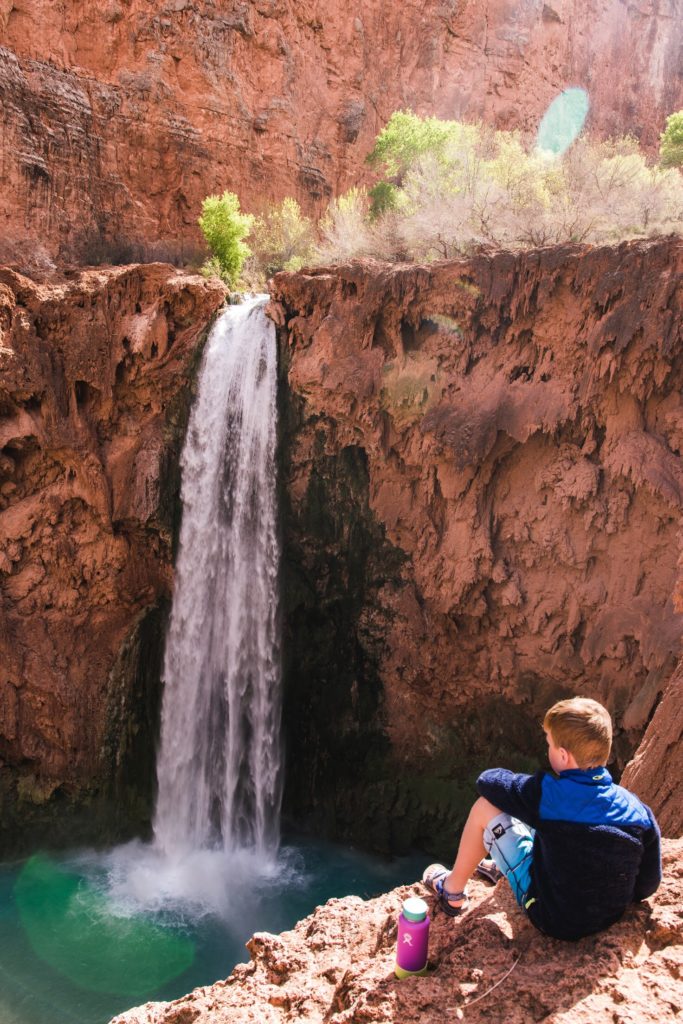
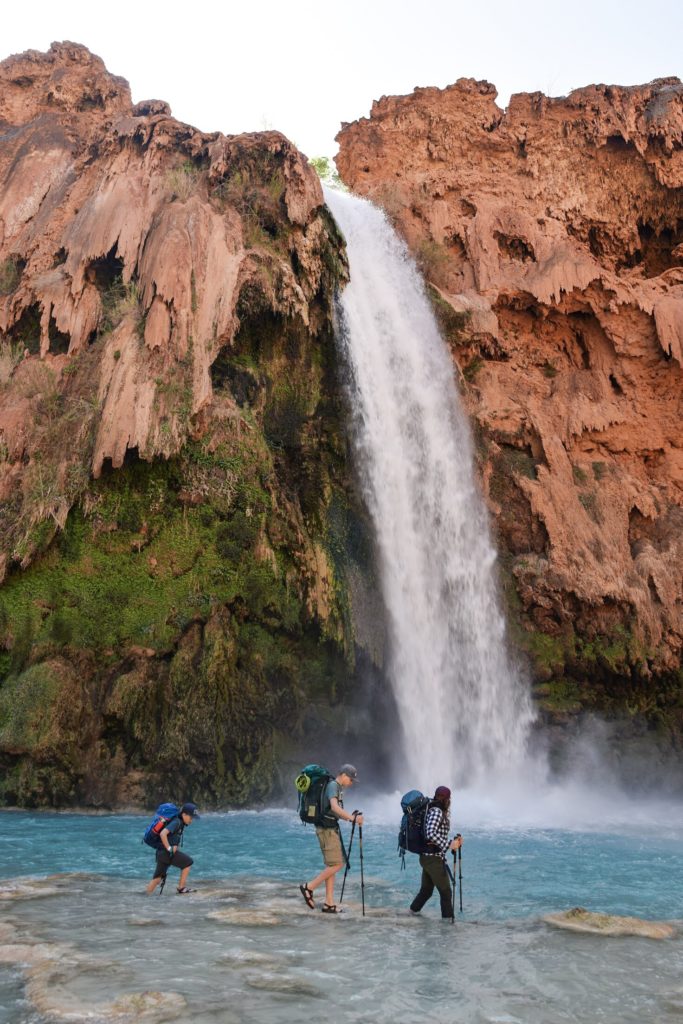
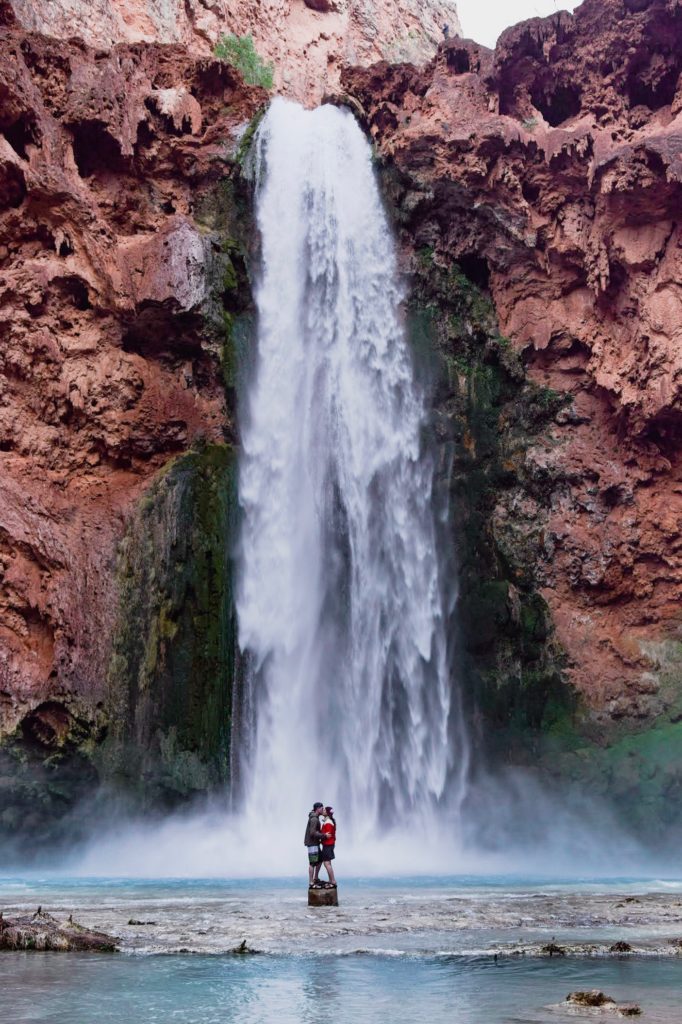
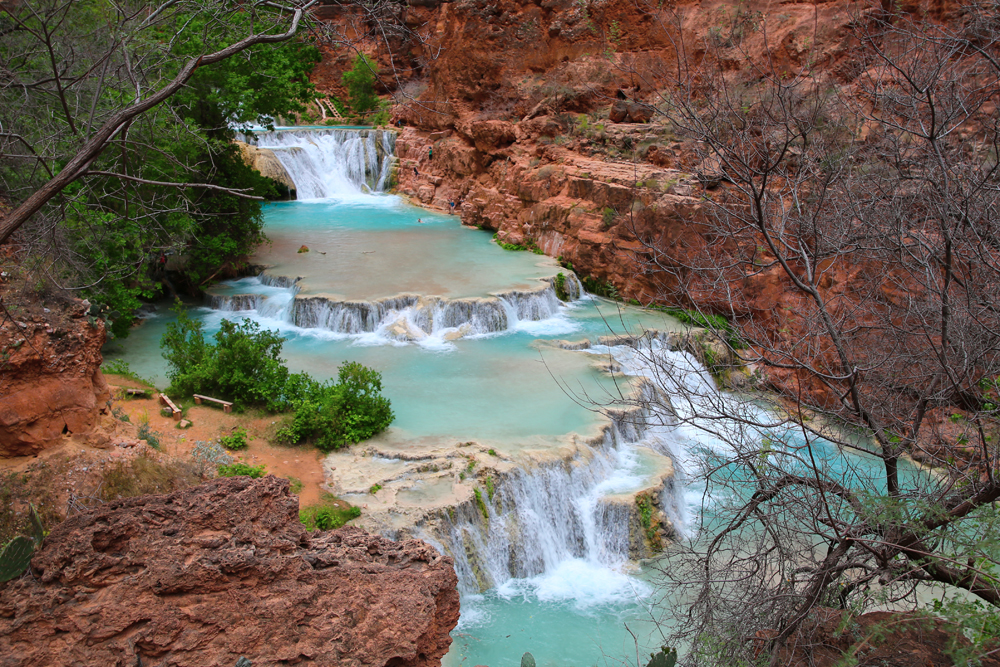
There are several waterfalls that make up Havasupai. The main attractions are Havasu Falls, the most famous of all the waterfalls (located at the start of the campground) and Mooney Falls, the tallest of the falls (standing at 200 feet) and located at the end of the campground (a mile apart). There are also other waterfalls not to be missed such as Beaver Falls, an additional 5-6 mile round trip past Mooney Falls and worth the trip (this one was our favorite!), Fifty Foot Falls and Navajo Falls which are located before you reach the campground, and many other hidden gems worth exploring if you have the time.
Beaver Falls was our favorite of the waterfalls and the best part was we had it all to ourselves!
A few notes and tips on the hike to Mooney and Beaver Falls. To get to Mooney Falls, which is located at the end of the campground (the top of the falls), you need to descend down a steep trail on a cliff, holding onto chains, climbing through a series of tunnels and caves, and lastly, down some very wet and slippery ladders. It might super sketchy, but if you take it slow and keep your kids close to you (always have an adult go first and last), it isn’t that bad and quite honestly, such an adventure!
Make sure to wear a rain jacket if the weather is cooler, as the mist from Mooney Falls will undoubtedly get you wet as you descend the ladders! It’s a good idea to do Mooney Falls in the morning too, before the crowds get here. Don’t miss the rope swing on the far side of the falls, hanging from a tree. There’s also a secret cave under the falls below the rope swing that is fun to explore. Our kids had a blast here!
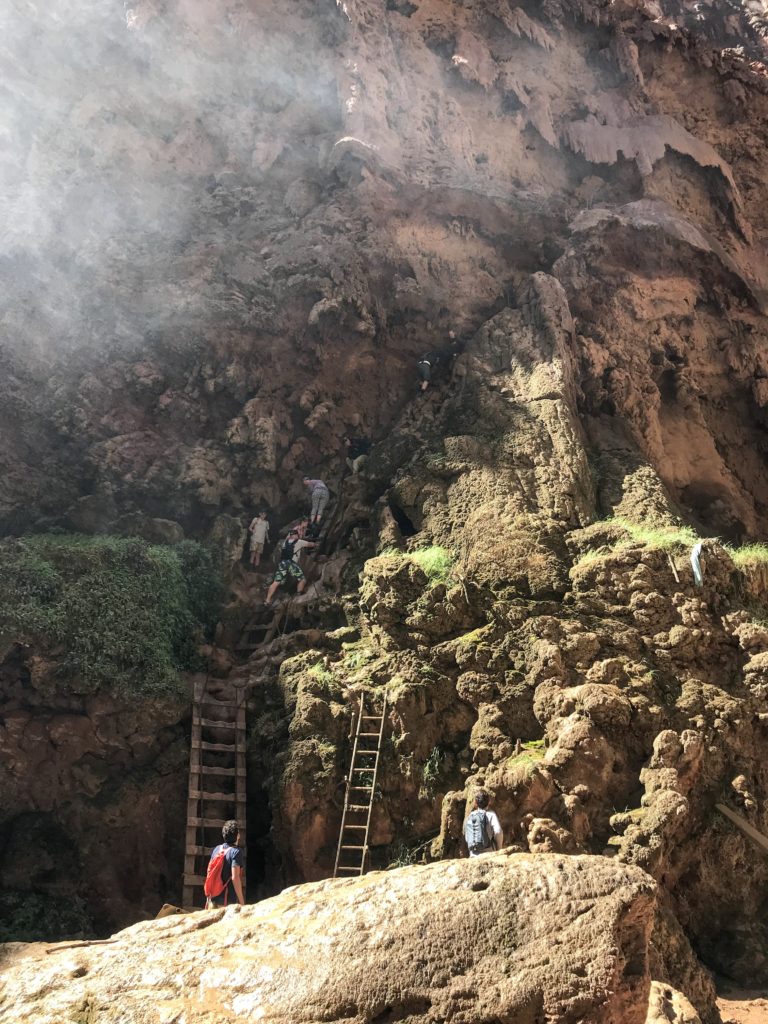
The descent down to Mooney Falls. You’ll feel like you’re in Indiana Jones!
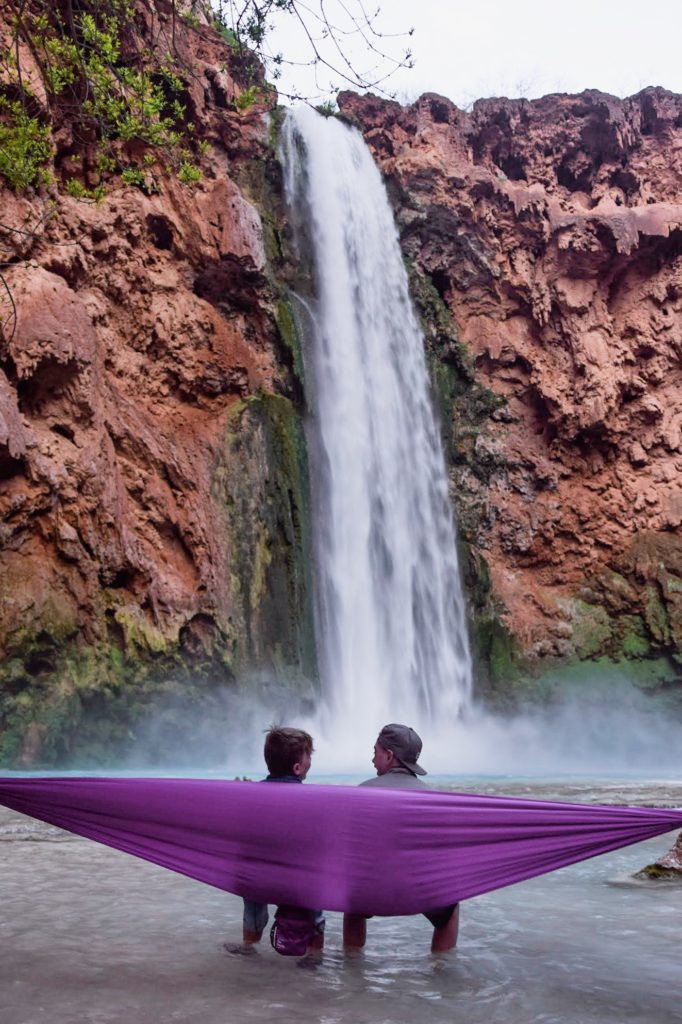
Relaxing from a hammock at Mooney Falls is a good way to experience these gorgeous falls.
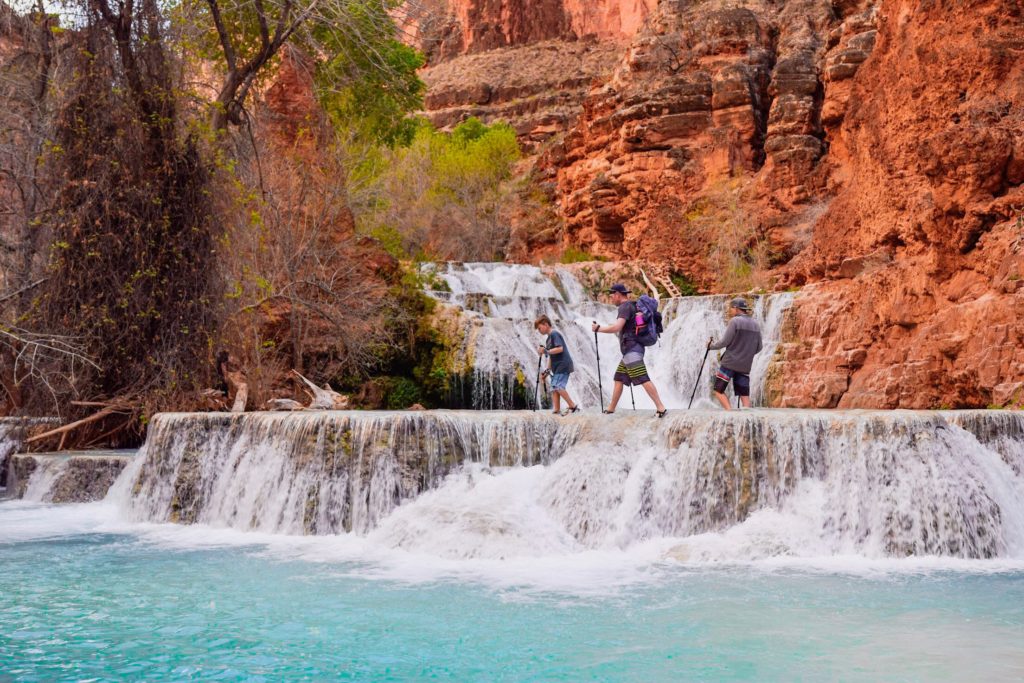
Beaver Falls is about 3 miles one way from Mooney Falls. This is an easy hike, and so beautiful! It was our favorite section of hiking trail through Havasupai! As mentioned earlier, expect creek crossings along this trail, so it’s best to just wear water shoes or sandals with decent traction like Chacos or Keens. The trail meanders through a stunning canyon and requires some fun scrambling up and down numerous rocks and a few more ladders and primitive bridges.
If you do this hike fairly early in the morning, you will likely find yourselves the only ones on the trail, as it isn’t as popular to go beyond Mooney Falls. Before you get to Beaver Falls, you will hike through a cave with a lone palm tree and ascend a ladder up the trail. (Another option is to just follow the creek down to the top of the Beaver Falls from this point.)
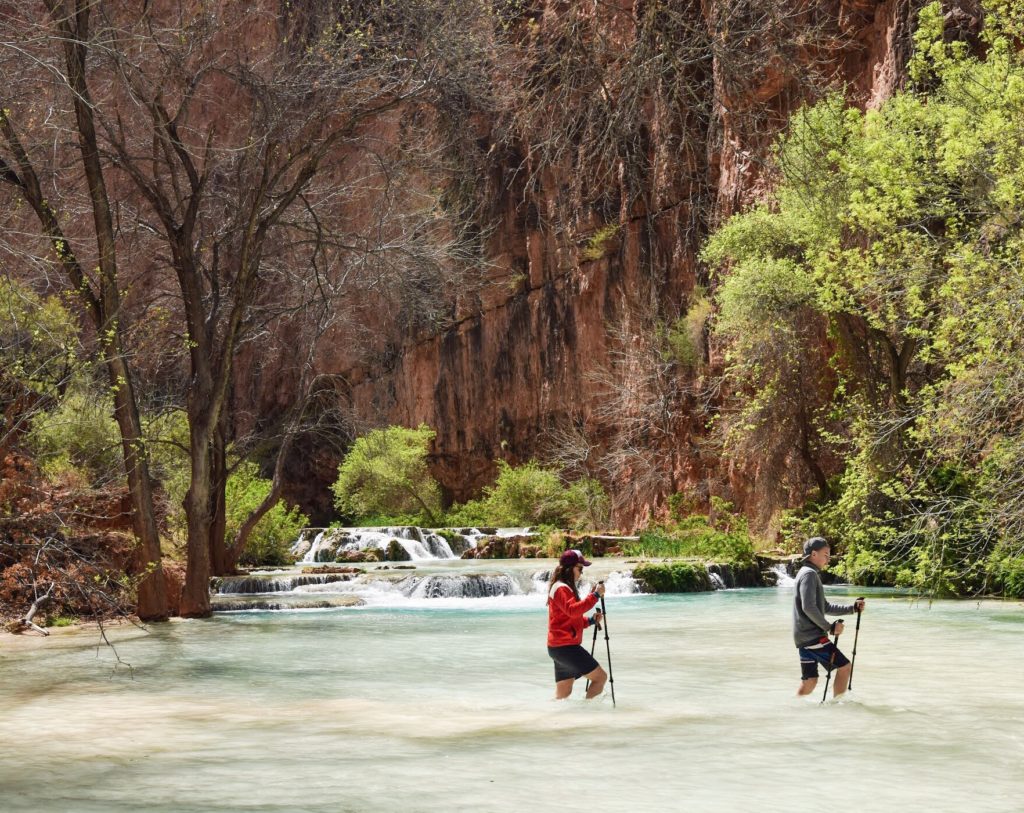
You will cross Havasu Creek several times along the trail to Beaver Falls. That’s what makes it fun!
The trail to Beaver Falls is beautiful the entire way, with the tall red rock canyons looming overhead and the creek rushing through it.
Beaver Falls is a lot different than the other major falls. For one, it is a serious of smaller, cascading waterfalls with small pools separating them. It is even more gorgeous in person though and such a treat to get to. The pools here provide great swimming holes too, so bring your blow-up pool tubes! On the far side of the tallest waterfall, there is a place you can get out and climb up the rocks with a ladder.
We might not suggest this with small kids, but this is a fun route to take if you want to explore more, plus you can take this route back up the creek (walking through the water), all the way back up to where the trail meets again at the lone palm tree. Quite the adventure!
The section of the creek near the lone palm tree is gorgeous. You can also choose to access Beaver Falls this way by walking through the creek.
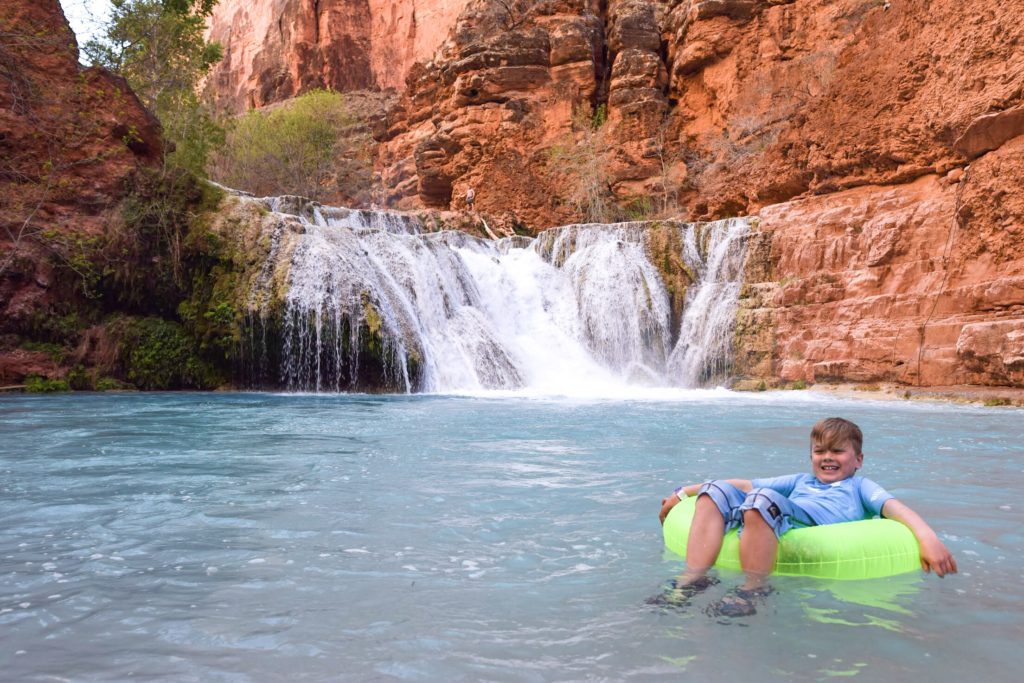
Bring some inflatable tubes for the kids to swim in at Beaver Falls. So fun!
If you’re going to attempt Havasupai, do yourselves a favor and stay for at least two nights. We mentioned this earlier, but it’s worth mentioning again. Hiking in one day, only to hike out the next day isn’t the best way to experience and really enjoy all that Havasupai has to offer. In in our opinion, it’s not worth going (especially with kids!), if you can’t stay at least two nights and three days.
Itinerary 1: Two nights/Three days
This is probably the most common itinerary and what we chose to do, mostly because it was so expensive for our family of four with all the permits. If you choose this option, the majority of day 1 will be spent hiking into the campground. Depending on how fast you hike or even how early in the morning you leave from the trail head, use this day to also stop and see Fifty Foot and Navajo Falls briefly which are just past Supai, or the village where you check in.
The reason we suggest pit stopping at these falls on the first day (opposed to Day 2) is because they are on your way to the main falls and the campground, so you’re not adding mileage by backtracking. Both of these waterfalls have swimming holes and because they get a lot of direct sunlight, are usually the warmest too. Bearfoot Theory has some great tips and suggestions for exploring these falls.
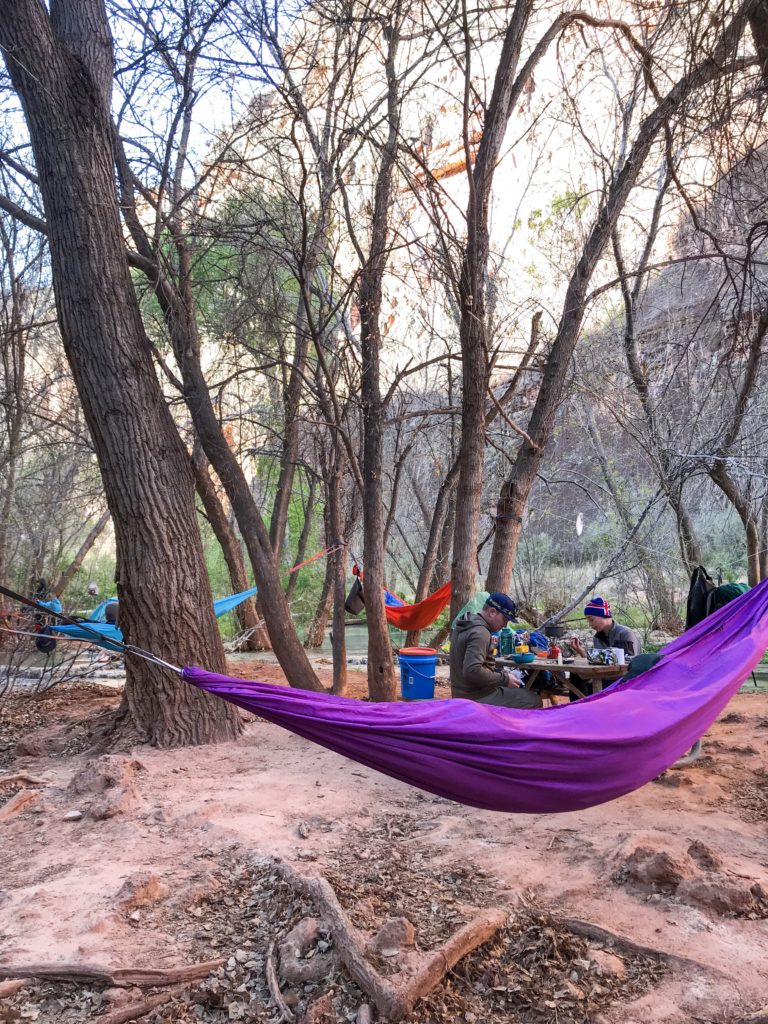
Our campsite, which was located right on the creek and near the end of the campground was perfect for hammock sleeping and listening to the sound of the rushing creek all night.
Once you reach Havasu Falls, you will want to spend some time here. There are several places to swim and it is a gorgeous place for a picnic. Don’t linger too long though, as you will need to find a campsite before dark. We were concerned that arriving in the evening would mean we wouldn’t find a good camping spot, but trust us, there are plenty of campsites and the campground is a mile long, so there is plenty of space.
Your initial inclination might be to quickly claim the first empty campsite you find, but hold out and keep walking towards the end of the campground. It gets prettier, there are more spots along the creek, more trees for shade (and hanging hammocks), and it is quieter.
Day 2, get up early and eat a good breakfast and aim to leave your campsite by 8 or 9AM to reach Mooney Falls (at the end of the campground) before other hikers arrive. Spend a couple of hours at Mooney Falls (remember it takes some time to descend down to Mooney Falls due to the cliffs), before hitting the trail to Beaver Falls. This hike will likely take the rest of the day (to get back to camp).
Day 3 is when you will hike out. We would advise getting an early start (even if it’s not hot) because it will take the entire day since it’s much harder hiking out. We stopped at Havasu Falls again on our way out, but that might be dependent on time and temperature.
Mooney Falls, as seen along the trail down the cliffs.
Itinerary 2: Three nights/Four days and beyond
With this itinerary, you will have a bit more time to enjoy all of the waterfalls longer. After spending Day 1 hiking in, reward yourself with a swim at Havasu Falls. Day 2 is spent hiking to Mooney and Beaver Falls, while Day 3 is all about exploring Fifty Foot and Navajo Falls. Use this day to just relax and swim or explore some other lesser-known waterfalls, such as Hidden Falls. On Day 4, you are hiking back out.
If you have at least four days and can afford to put some more mileage on your legs, another popular trek to add is the hike to the Confluence. The Confluence is where Havasu Creek meets the Colorado River along the Grand Canyon. This adds on another 16 miles though, so it’s best to do this with adults and/or older kids that are up to it! To get there, you simply continue past Beaver Falls for another 5 miles. If you choose to do the Confluence, we’ve heard it’s wise to do this on the same day you do Beaver Falls (starting super early).
Now comes the most important part. Packing. The gear. And all that fun and necessary stuff. When it came to preparing for the actual trip, this is where we spent the most time planning and preparing. Because this was our boys’ first long backpacking trip, we wanted to be super prepared and also make their packs as light as possible.
When you are packing your gear at home, it’s important to weigh your packs (even with water) so that you know how much weight you’re carrying and what to take out if necessary. We kept our packs between 25-35 lbs and the kids packs between 15-20 lbs (pack even lighter if kids are younger or inexperienced). Download and print our Havasupai Packing List.
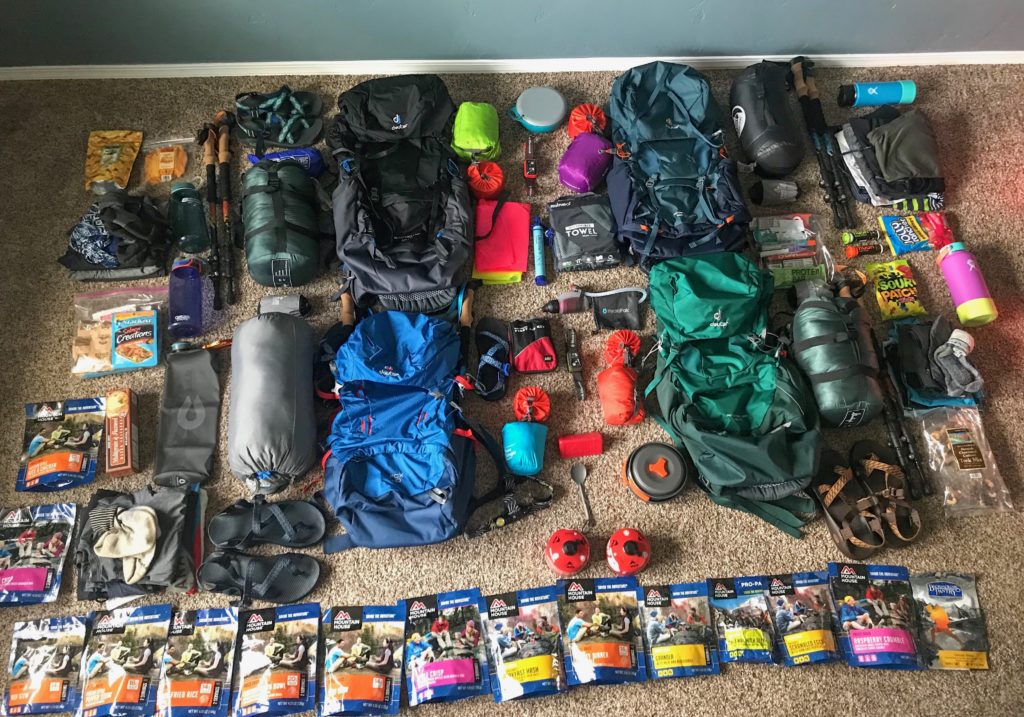
All the gear! Being organized when preparing for a backpacking trip is key.
Backpacks
Make sure you have a good backpack that is supportive, the right size for your frame, and comfortable to wear for long periods of time. We love the Deuter Air Contact Lite series because they have a lightweight internal frame, a ventilation system, load adjustment straps, a padded hip belt, and lots of cool pockets and features. If you aren’t sure what size you or your kids need, go to REI to be fitted (even if you don’t buy backpacks there). We carried the Air Contact Lite 65+10 and the Air Contact Lite 60 +10 SL (women’s fit), and our boys carried the Air Contact Lite 50+10 and the kids Fox 40 backpack.
With some smart planning, you can pack your backpacks fairly light without breaking the budget.
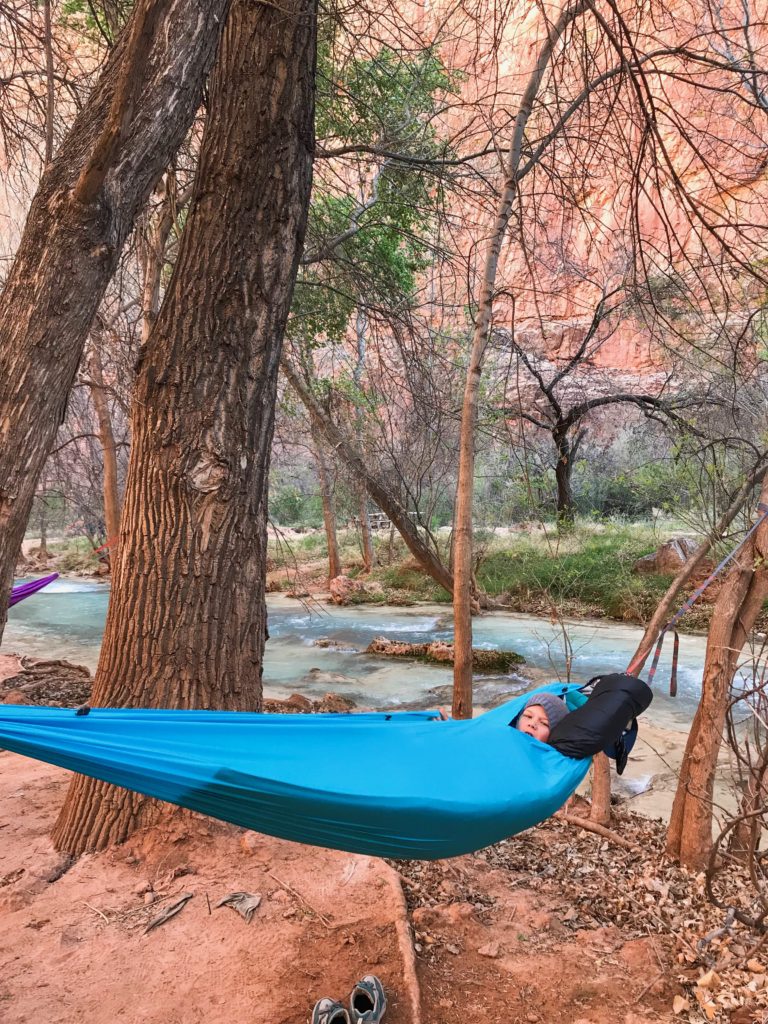
Tent or Hammock?
This might be the hardest decision when packing for Havasupai–deciding what to sleep in. If you are going to Havasupai during warmer months (March-Nov), it’s wise to just skip the tent and sleep in a hammock. Hammocks are lighter weight and take up less space than a tent (plus there are plenty of trees at the campground!). We each got hammocks from Kammok (the Roo Single for the kids and the Roo Double for the adults), and it was perfect!
These hammocks weigh less than 1 lb and take up hardly any space in your pack. They are also super easy to put up and come with adjustable straps (we suggest getting the 15 ft straps for more length). Also, don’t try to sleep more than one person per hammock! It will make for a more comfortable sleep. The only exception to this is if you have a small toddler or baby with you.
If you are going when there’s a chance of rain (watch the forecast), it’s a good idea to bring a rain fly for the hammocks just in case. Kammok makes a good all-weather rain fly, or you can get this Bear Butt rain fly on Amazon. Don’t worry about getting a rain fly for each hammock, you can always stack two hammocks on top of each other!
Snug as a bug in a rug
If you choose to sleep in a tent, there are some great, economical and lightweight options that are ideal for backpacking such as the Nemo Hornet 2P tent or our personal favorite, the Big Agnes Copper Spur HV UL 2 tent, both weighing around 2 lbs! If you have kids with you, each adult might have to carry a tent to avoid packing a bigger, heavier tent.
Sleeping Essentials
Having a high quality sleeping bag is essential and generally speaking, a bag that goes down to 20 or 30 degrees should suffice for camping at Havasupai. In the summer months, you certainly don’t need a bag with this temperature rating, but we suggest having one that goes down to 20-30 degrees just for versatility. As for lightweight sleeping bags, we love the Nemo sleeping bags because they are lightweight and a good price point. Plus, they come with a compression stuff sack which is a must for backpacking.
A good sleeping mat is required too, regardless if you sleep in a tent or hammock for good insulation and padding. We debated bringing mats on our trip, but ultimately we did because when you sleep above the ground, it’s much colder (up to 20 degrees cooler!).
Mats also make hammock sleeping more comfortable (especially for most adults!). We love Big Agnes sleeping pads because they are lightweight, compact and blow up/take down fast. Plus, they are super comfy! The Air Core Ultra is a great option and also affordable, and the Insulated AXL Air is an awesome 3-season solution that offers even more padding without the extra weight (voted one of the best mats for backpacking!).
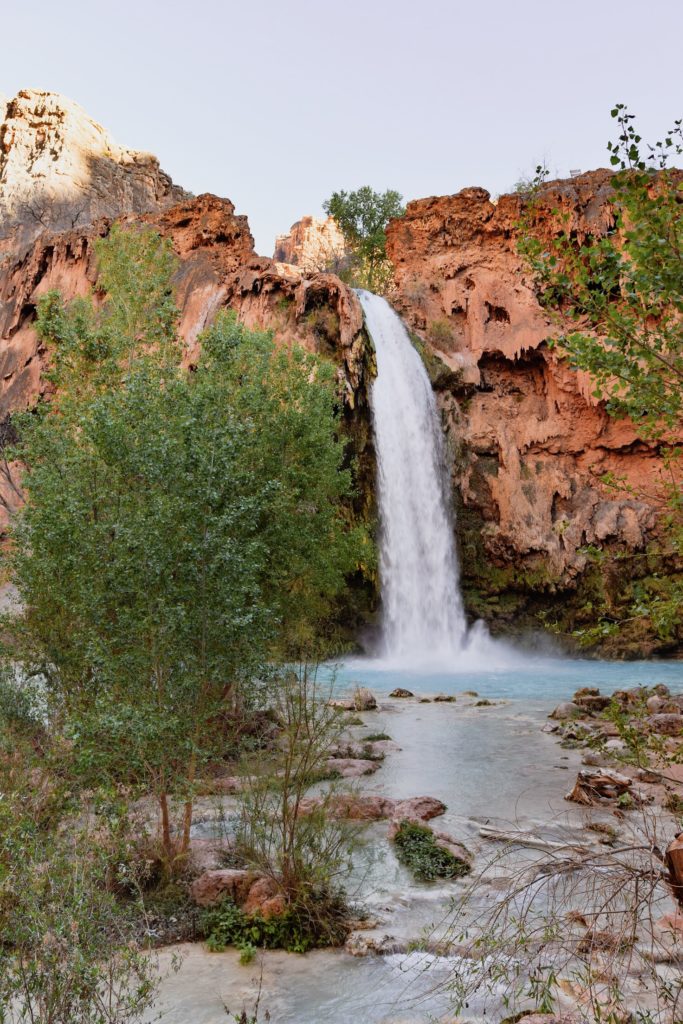
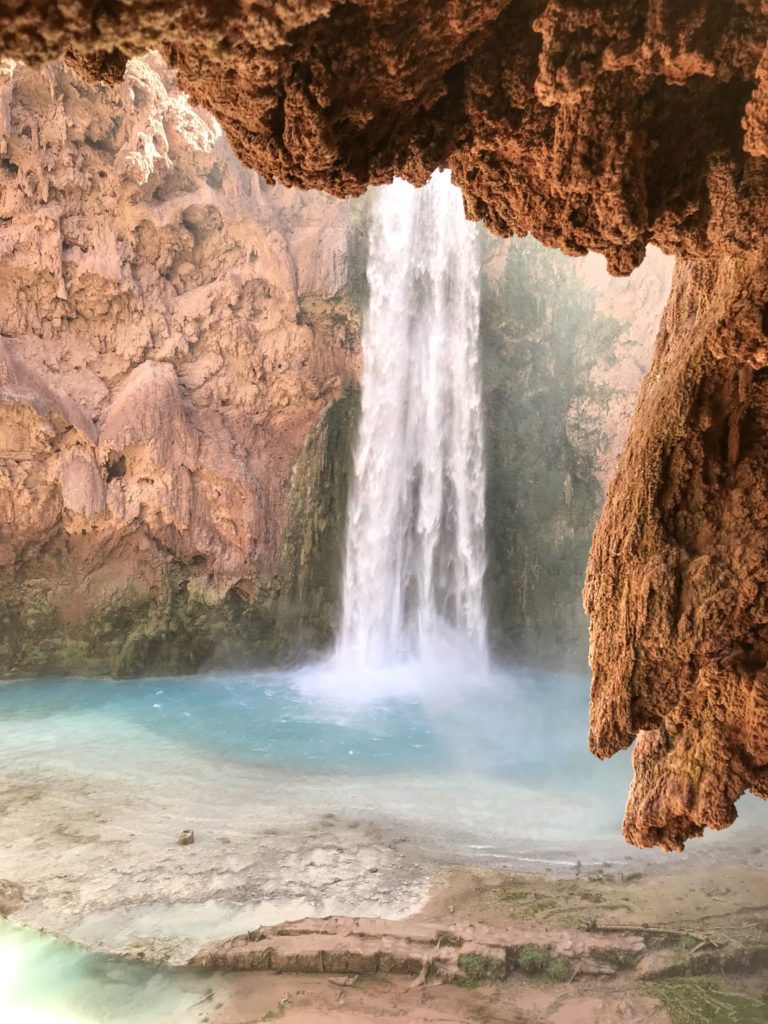
Havasu Falls
A good camping pillow is a must for hammock or tent sleeping and we found these lightweight Hikenture pillows on Amazon that are super cheap, but awesome! They take up hardly any space and are easy to inflate. If you decide to hammock sleep and don’t have a super warm sleeping bag or if you go during the colder months, it might be a good idea to bring an emergency blanket for extra insulation or a down blanket like our favorite Rumpl camping blanket! These are amazing and keep you warm and cozy. We’ve even heard of people sleeping with only a down blanket in a hammock in the hot summer months!
Food & Water Essentials
When you go backpacking, you have to bring a lightweight backpacking stove to cook your food like best-seller Jet Boil or our personal go-to, the MSR Pocket Rocket. Keep in mind that you will need to bring propane too, and if you’re not sure how much propane you need (because it depends on how often you use your stove, how many liters of water you’re boiling, etc), call your local REI and ask a camping expert or check out this blog post on calculating how much propane you need.
The trail to Beaver Falls has all sorts of hidden gems.
If you’re mostly eating backpacking food such as our favorite, Mountain House meals (which we’ve found to be the best tasting and most economical), you can skip bringing the full mess kit (and eat straight out of the bag!) and just bring eating utensils such as this lightweight, titanium spork or even this awesome multi-tool.
You’ll need a good water filter too since the only drinking water in Havasupai can be found at the spring in the campground. We love the MSR Trail Shot water filter because it’s super small (you could literally fit it in your pocket) and easy to use. This MSR Mini Works water filtration system is good too, and it’s always a good idea to have a back-up like a Life Straw in case your water filter fails.
In addition to a water filter, bring plenty of water bottles and even a water storage container like this MSR Dromedary 6L bag or if you don’t want to carry that much water, the HydraPack Seeker 3L collapsible bag (which is what we used). As far as water bottles go, people will argue not to bring heavy water bottles like Hydro Flasks, but we prefer cold water (since Hydro Flasks keep your water cold up to 24 hours) and so it was worth carrying a little extra weight in our water bottles. We love the 24 and 32 oz size water bottles the best.
We don’t go anywhere without our Hydro Flasks.
Other Packing Essentials
It’s wise to bring a stuff sack or a luggage cube to store your clothes, mostly so you can keep them together, but also in case anything gets wet, you can put damp clothes in there. We love Sea-to-Summit stuff sacks and for luggage cubes, you can’t go wrong with Jet Pal travel organizer since they are lightweight.
If you plan to swim, make sure to pack a quick-dry microfiber towel like this Rain Leaf backpacking towel (we got the extra large size). You will also need to bring a headlamp for each person such as the Black Diamond 300 Lumen headlamp.
Since squirrels are a BIG problem at Havasupai (trust us, they are ravenous and will chew through your tents and backpacks to get any food), it is absolutely ESSENTIAL to bring a rat sack or even better, a ruggedized dry bag to store all your food in (we bought the 20L because it fits more food). It’s also a good idea to bring odor-free garbage bags to keep critters and bugs out of your trash.
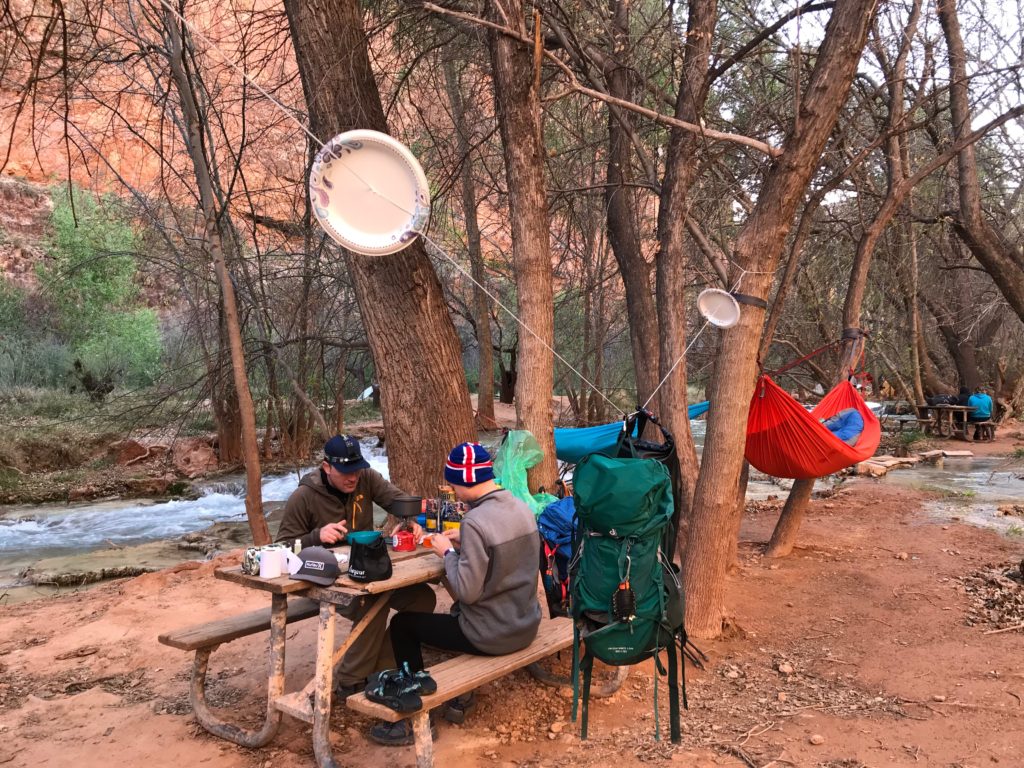
You must hang your packs and food on rope or paracord between trees at your campsite to keep the squirrels and other animals out of your food.
We’ve included all other necessary items such as a clothing essentials, first aide kit, para-cord or rope, and more in our Havasupai Packing List.
1. Do not over pack. We stated this earlier, but we can’t reiterate this enough. To avoid over packing or making your packs too heavy, consider wearing the same clothes the whole time. We basically wore the same clothes for 3 days minus swim suits, base layers to sleep in, and an extra pair of socks and underwear.
Think lightweight layers such as thermals, down jacket, etc. Also, don’t forget a beanie if you’re going during the colder months! Only bring necessities and try to save weight as much as you can with things like sleeping bags, a tent or hammock, mat, clothes etc. Every ounce counts!
When it came to our packs, the food weighed the most, so make sure you bring lightweight snack and food items such as backpacking meals, instant oatmeal, and tuna packets instead of canned goods or other heavier food items. Make sure when you disperse the food and snacks that you give your kids the lightest food items to carry (or no food at all). If you’re worried about running out of food, there is a general store at the village if you need to pick up anything.
Keeping packs as light as possible is key!
2. Pack smart and bring foods that the whole family enjoys. Kids need extra motivation on the trail sometimes, so sometimes you’ve got to pull out all the stops! Some of our go-to snacks are Trader Joe’s dried fruit and trail mix, beef (or chicken) jerky sticks, G2G protein bars, tuna packets with crackers, Jolly Ranchers (we like them because they last longer), Sour Patch Kids, Gummy Bears, even lollipops! Because you will be losing a lot of water through sweat as you hike, it’s important to replace your electrolytes. We like to add in our water, Nunn Hydration tablets or Zip Fizz (also great for a boost of energy!).
3. Camp in the parking lot next to the trail head, so you can get an early start on the trail. But if you would rather sleep in a bed, you can book a room at the Hualapai Lodge about 60 miles away in Peach Springs. We camped right beside our car and it wasn’t the best night sleep with the wind howling all night, but it worked!
4. Bring Ibuprofen for sore muscles and joints. We each took some Tylenol at the end of each day and felt great the next day. No achy joints and muscles!
5. Put some Glide on your feet. This is to avoid blisters, so your feet don’t chafe or rub inside your socks/shoes! And if you start to get a “hot spot”, slap some moleskin or even duct tape on it! There are also some great blister gel band-aids that work great too.
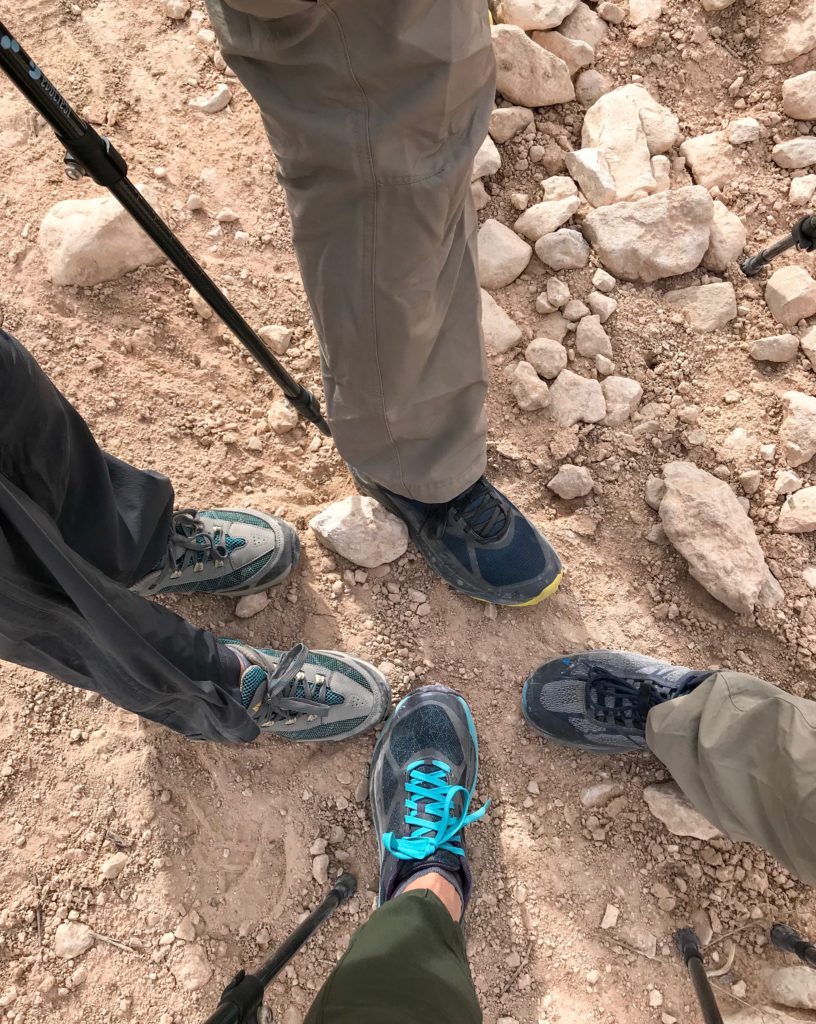
6. Consider wearing trail running sneakers instead of hiking boots. This is not to say that hiking boots aren’t great, but if you’re not used to wearing boots, good trail running shoes might offer better arch support. We loved our Vasque Trailbender shoes. They were supportive, comfortable and no one got blisters!
We opted to wear trail running shoes with great arch support for this hike. It was a good choice!
7. Bring a small backpack to carry food/water and necessities for day hikes. Or empty out your gear out of the smallest pack and leave everything else back at camp.
8. Grab a bucket at your campsite. When you reach the campground on the first day, keep your eyes peeled out for an unused 5 gallon bucket (provided by the Havasupai tribe) to store your food and anything with a scent. There are only a limited amount of buckets, however, so don’t bank on getting one (and hence why you should bring a ruggedized dry bag).
It’s important that you hang everything, (including the bucket and dry bag) when you leave the campsite for the day (and even at night when you’re sleeping) to keep the pesky critters out.
Seemed like a good photo op for a smooch.
9. Have some games you can play on the trail with kids. When you’re hiking with kids, you will need to pass the time quickly and we’ve found that games are a great way to distract them. We love the alphabet game, “I’m going on a picnic (or hike) and I’m going to bring…”, the “Would you rather…” game and of course, the ever-popular “I Spy” game. It’s amazing how time flies when you’re having fun and carrying on a conversation.
10. Bring trekking poles! These were a game changer to us in so many ways. They helped us balance on loose rocks along the trail, cross the creek, and made hiking uphill easier. Basically, hiking poles will make you more efficient and take some load off of your joints.
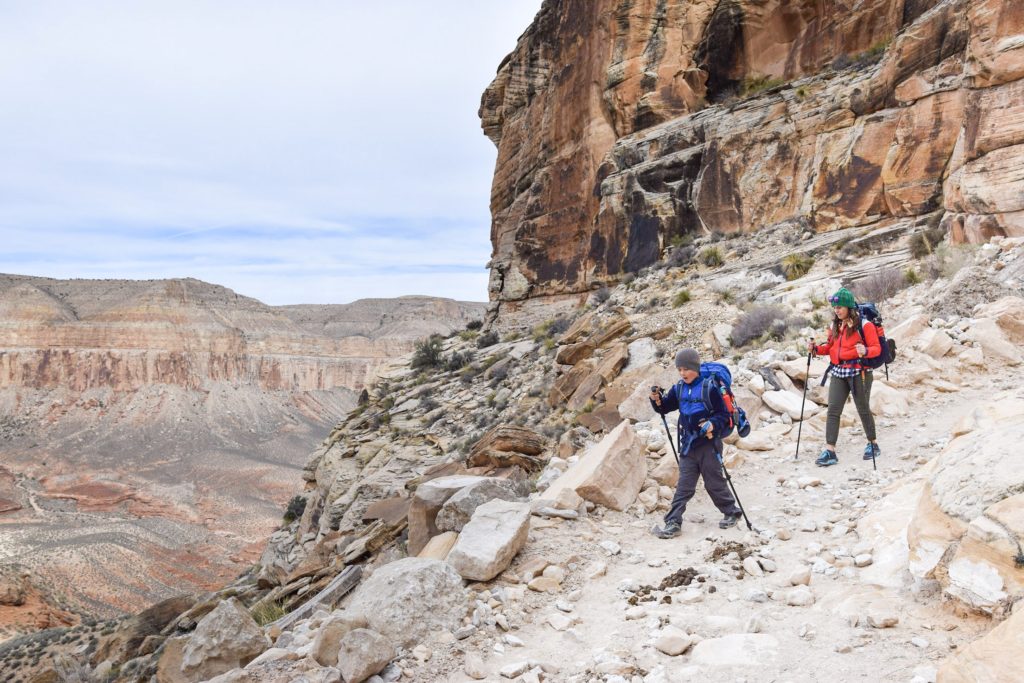
Trekking poles help you uphill and downhill.
11. Keep some snacks and cold beverages back at your car. This way when you finish the hike, you will be rewarded! We left frozen Gatorade in a cooler in our car and when we got done, it was thawed but still cold! So refreshing!
12. Be friendly and respectful with the local tribe. We met so many kind and wonderful people in the village, and it was worth stopping and learning more about their culture and the history of their land.
13. LEAVE NO TRACE! Pick up your trash and if you see trash on the trail, pick it up too. This is a beautiful land and we should respect it, so do your part and keep it pristine. Enough said.
Would you want to see this place covered in trash? Let’s keep this beautiful land and water clean and pristine.
14. Pack flotation tubes for some extra fun in the water. Your kids and you will enjoy relaxing in the pristine blue waters beneath the falls and in the creek.
15. Don’t bring a drone. They are prohibited here. As for other camera equipment, make sure to bring extra batteries, and only bring the necessities (such as one extra camera lens). We skipped the tripod because of weight, but if you must bring a tripod, bring a lightweight one.
16. Make sure to stop in the Supai village. On your hike out, you have to try the delicious Navajo tacos or fry bread! Or ice cream if it’s hot outside!
17. HAVE FUN and make amazing memories with your kids! Don’t rush the experience, take your time and allow your kids to fully appreciate this incredible place and accomplishment they’ve made!
Have you done Havasupai yet? Add it to your bucketlist if you haven’t yet. You can also make a road trip out of it and visit some nearby national parks. Another option is to head to Southern Utah and try some of these amazing day hikes and outdoor adventures in St. George!